
I'll definitely weigh it at the end - it's certainly one of the lighter instruments I've got. It'll be nice to get the paint all done, then the only thing will be making a new pickguard.Originally Posted by wokkaboy


I'll definitely weigh it at the end - it's certainly one of the lighter instruments I've got. It'll be nice to get the paint all done, then the only thing will be making a new pickguard.
Completed Builds: #1 TL-1 "Telemaster" (GOTM Oct 2016); #2 The "Maplecaster" scratch build; #3 JB-4 "Bass IV" (co-winner GOTM Jan 2017); #4 ST-1M "Surfcaster" (GOTM Apr 2017), #5 JZA-1 "EC Deluxe"
Time to share some pain!
As you can see, the second stage of masking/painting was an unmitigated disaster!! Now I like to think Ive started to get a feel for painting based on my previous builds but this result is the ultimate example of not doing it right! Now that I see the result I can pinpoint almost every step where I went wrong.
1. I should have sanded the base colour a bit more to give the masking tape something smoother to adhere to. I was obviously too rough and the paint had openings to flow under the tape. Lesson: prepare, prepare, prepare.
2. I used a thin vinyl tape to get the edges right. I thought this was a good choice as when going around the edges/sides and through the belly contour the tape had to be flexible to follow the right line it worked okay on my Surfcaster build. This time it just didnt get enough adhesion onto the paint. Lesson: much more care with masking.
3. Paint choice. Ive used MTN94 spray on all builds and it has worked beautifully. For the black I grabbed some White Knight satin black as I couldnt be bothered ordering the MTN black in. As soon as I started spraying I could tell it seemed very thin and wet. Now I know some of this is my technique, but that aside it still didnt feel right. Lesson: stick with paint you know!
4. Removing the masking. I definitely did this too soon as you can see where it lifted paint. Lesson: respect drying times!
When Ive had things go wrong in the past Ive tried to turn it into an opportunity to do something a bit different, but this time I dont think I have that option. Ive thought about a more relic/punk kind of feel but I think it would still look like a mistake.
So, its time to sand back. Ill probably abandon the striping for this one and go solid. Even then it will be interesting to see if you can still tell where the mistake was.
Ah well, live and learn!
Completed Builds: #1 TL-1 "Telemaster" (GOTM Oct 2016); #2 The "Maplecaster" scratch build; #3 JB-4 "Bass IV" (co-winner GOTM Jan 2017); #4 ST-1M "Surfcaster" (GOTM Apr 2017), #5 JZA-1 "EC Deluxe"

Building these things certainly tests your resolve. Have been trying to finish my surfcaster build. You think all is good and then bugger. I just walk away, regroup, and go again
Builds to date
#1, 3 string box guitar
#2, GR-1SF, November guitar of the month 2016
#3, Charvel Surfcaster tribute scratch build. ( Completed )
#4, Pawn shop Strat ( Completed )
#5, Current build MM-1Q
Too true - and I guess the other thing to always remember is that there's very little you can do wrong that can't be fixed in some way!
Completed Builds: #1 TL-1 "Telemaster" (GOTM Oct 2016); #2 The "Maplecaster" scratch build; #3 JB-4 "Bass IV" (co-winner GOTM Jan 2017); #4 ST-1M "Surfcaster" (GOTM Apr 2017), #5 JZA-1 "EC Deluxe"

A good tip when painting stripes is mask them up and paint a light coat of the base colour so it seals up the edges of the tape and if any does get under it's not noticable. Then paint the next colour over that.
robbo

I would have done the 2 outside stripes as adhesive pin-striping...if not even the centre if it was wide enough.
Still, we're all different eh?
cheers, Mark.
I used adhesive pinstriping on my last build Mark, but I wanted to try something different. But you're right - it would have definitely been a better result!
Completed Builds: #1 TL-1 "Telemaster" (GOTM Oct 2016); #2 The "Maplecaster" scratch build; #3 JB-4 "Bass IV" (co-winner GOTM Jan 2017); #4 ST-1M "Surfcaster" (GOTM Apr 2017), #5 JZA-1 "EC Deluxe"
The worst thing is that I know that, Robbo! Why the hell I didn't do it is anyone's guess!
Completed Builds: #1 TL-1 "Telemaster" (GOTM Oct 2016); #2 The "Maplecaster" scratch build; #3 JB-4 "Bass IV" (co-winner GOTM Jan 2017); #4 ST-1M "Surfcaster" (GOTM Apr 2017), #5 JZA-1 "EC Deluxe"
I've done that too "I knew that but still did it wrong... arrrrggggghh..." and I'm sure most people here would probably admit to it too.
I'm sure you'll fix it up and it will be killer.
It's a sweet looking built.
robbo
So, a funny thing happened yesterday...
After sanding back my GT stripe disaster I started work building the body's base colour back up - having decided to keep it as a simple single colour rather than tempt fate again! It was at the point where it only needed a couple of touch ups, so I wandered out onto the driveway to do the job. All going well until I went to kind of swing the body around to get at the other side... and it somehow separated from the "neck stick", the screws literally ripped out. I've never had that happen. Anyway, I watched - in slow motion - as the body sailed skywards then headed towards the dropoff at the edge of the driveway down to a concrete path a couple of metres below. The results, other than a lot of dings and scrapes that could probably have been sanded out or filled, is below:
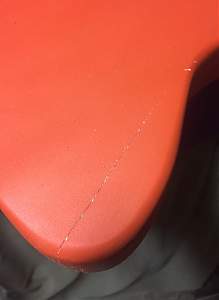
I am quite surprised that the joints have opened up like that, although all the cracks are in areas where the huge body route meant less wood.
I'm going to call this one quits for now - I'm obviously being sent a sign that this body was not meant to be! Of course the good bit is I have a neck and a fully loaded pickguard and hardware to put onto a new body. I'd still like to have a crack at the modified Toronado shape but figure I now have a blank canvas to work on. We'll see what I come up with.
In the meantime I've got a JZA-1 kit ordered that I'm planning to build with way less modifications than I normally plan, so hopefully that will get my build mojo back on track.
RIP this build!
Completed Builds: #1 TL-1 "Telemaster" (GOTM Oct 2016); #2 The "Maplecaster" scratch build; #3 JB-4 "Bass IV" (co-winner GOTM Jan 2017); #4 ST-1M "Surfcaster" (GOTM Apr 2017), #5 JZA-1 "EC Deluxe"
 Posting Permissions

 Reply With Quote