Page 5 of 10 FirstFirst ... 3 4 5 6 7 ... LastLast
Results 41 to 50 of 99

Thread: first build flying v

  1. #41
    Member
    Join Date
    Jun 2017
    Location
    Adelaide
    Posts
    157
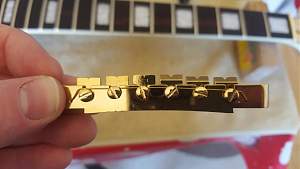
    hey guys i have a little issue, i think my bridge isnt right. the small bits that you can adjust the intotaion (hope i said that right) i think they are around the wrong way. dont the bigger grooves hold the thicker strings? or am i incorrect. i have attached photos to help what i mean.
    Click image for larger version. 

Name:	rps20170622_123405.jpg 
Views:	273 
Size:	44.1 KB 
ID:	20167
    Click image for larger version. 

Name:	rps20170622_123235.jpg 
Views:	281 
Size:	39.4 KB 
ID:	20168

  2. #42
    GAStronomist wokkaboy's Avatar
    Join Date
    Dec 2012
    Location
    Perth WA
    Posts
    13,555
    Hey Brokin, yes the wider grooves are for the wound strings. You will still be able to access the saddle intonation screws from the bridge pup side all good.
    You may have to raise the bridge height a little to access them. Start with the saddles around the centre of adjustment.

    A tip it's easier to remove the clear plastic on the pickguard if you remove the pots, switch and mounting screws first
    Last edited by wokkaboy; 22-06-2017 at 12:18 PM.
    Current Builds and status
    scratch end grain pine tele - first clear coat on !
    JBA-4 - assembled - final tweaks
    Telemonster double scale tele - finish tobacco burst on body and sand neck

    Completed builds
    scratch oak.rose gum Jazzmaster - assembled needs setup
    MK-2 Mosrite - assembled - play in
    Ash tele with Baritone neck - neck pup wiring tweaks and play in

  3. #43
    Member
    Join Date
    Jun 2017
    Location
    Adelaide
    Posts
    157
    thanks again wokkaboy. just thinking can i swap them around so i can adjust them from the outside? or is that not recommended?

  4. #44
    GAStronomist wokkaboy's Avatar
    Join Date
    Dec 2012
    Location
    Perth WA
    Posts
    13,555
    sure Brokin you can reverse the saddles. Keep the saddles in the same order if the grooves are wider for the low E string and narrower for the high E string. It will make the saddle adjustments easier.
    I just had another look at the pic, the saddle heights are higher for D and G strings so keep the saddles in the same order. This is to keep the string heights similar to the fingerboard radius
    Last edited by wokkaboy; 22-06-2017 at 12:23 PM.
    Current Builds and status
    scratch end grain pine tele - first clear coat on !
    JBA-4 - assembled - final tweaks
    Telemonster double scale tele - finish tobacco burst on body and sand neck

    Completed builds
    scratch oak.rose gum Jazzmaster - assembled needs setup
    MK-2 Mosrite - assembled - play in
    Ash tele with Baritone neck - neck pup wiring tweaks and play in

  5. #45
    GAStronomist wokkaboy's Avatar
    Join Date
    Dec 2012
    Location
    Perth WA
    Posts
    13,555
    no worries Brokin that's what we are here for - to help. Keep the saddle orientation the same as well
    Current Builds and status
    scratch end grain pine tele - first clear coat on !
    JBA-4 - assembled - final tweaks
    Telemonster double scale tele - finish tobacco burst on body and sand neck

    Completed builds
    scratch oak.rose gum Jazzmaster - assembled needs setup
    MK-2 Mosrite - assembled - play in
    Ash tele with Baritone neck - neck pup wiring tweaks and play in

  6. #46
    Member
    Join Date
    Jun 2017
    Location
    Adelaide
    Posts
    157
    all sorted 😁
    Click image for larger version. 

Name:	rps20170622_130550.jpg 
Views:	283 
Size:	45.7 KB 
ID:	20169

  7. #47
    GAStronomist wokkaboy's Avatar
    Join Date
    Dec 2012
    Location
    Perth WA
    Posts
    13,555
    looks good Brokin. So you up to the wiring stage ? have you decided for 2 volumes or 2 tones ?
    Current Builds and status
    scratch end grain pine tele - first clear coat on !
    JBA-4 - assembled - final tweaks
    Telemonster double scale tele - finish tobacco burst on body and sand neck

    Completed builds
    scratch oak.rose gum Jazzmaster - assembled needs setup
    MK-2 Mosrite - assembled - play in
    Ash tele with Baritone neck - neck pup wiring tweaks and play in

  8. #48
    Member
    Join Date
    Jun 2017
    Location
    Adelaide
    Posts
    157
    hey wokkaboy, wiring already done. 1 volume 2 tones. Click image for larger version. 

Name:	rps20170620_193428.jpg 
Views:	268 
Size:	70.7 KB 
ID:	20170

    im pretty much ready to string it up and set it up and if all is good hoepfully have it playing.
    one question i just remembered. they mentioned the guitar needs time to settle itself in, roughly how hong does it take to settle it in?

  9. #49
    GAStronomist wokkaboy's Avatar
    Join Date
    Dec 2012
    Location
    Perth WA
    Posts
    13,555
    good work Brokin. Will probably take a few days to settle in. Too many variables to list like humidity, string tunings etc. Best thing to do is play the guitar as much as you can and the neck will settle in quicker. Then you should be able to do the final setup and intonation. If you are using the supplied plastic nut the slots tend to be high.
    Current Builds and status
    scratch end grain pine tele - first clear coat on !
    JBA-4 - assembled - final tweaks
    Telemonster double scale tele - finish tobacco burst on body and sand neck

    Completed builds
    scratch oak.rose gum Jazzmaster - assembled needs setup
    MK-2 Mosrite - assembled - play in
    Ash tele with Baritone neck - neck pup wiring tweaks and play in

  10. #50
    Mentor Kick's Avatar
    Join Date
    Feb 2017
    Location
    Amsterdam, The Netherlands
    Posts
    823
    Good job indeed Brokin. Your story reminds me to check the saddles on my bridge
    Nr 1: Red Widow LP-1MQ (Finished) ->Diary<-

Page 5 of 10 FirstFirst ... 3 4 5 6 7 ... LastLast

Posting Permissions

  • You may not post new threads
  • You may not post replies
  • You may not post attachments
  • You may not edit your posts
  •