
nice and tidy Woolley, great job! Not far off now,


nice and tidy Woolley, great job! Not far off now,
FrankenLab:
Turning tone wood into expensive sawdust since 2016!

Just wondering; you used multiple pieces I guess to cover the whole cavity. Do you need to connect those pieces with some solder? I ask this because I have no idea if this should be done.
Nr 1: Red Widow LP-1MQ (Finished) ->Diary<-
Depends on whether the adhesive is conductive or not. If it passes a current across the pieces it should be okay?Originally Posted by Kick

FrankenLab:
Turning tone wood into expensive sawdust since 2016!

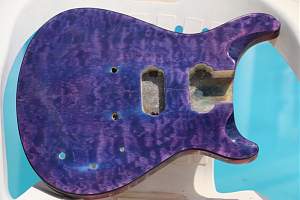
That blue stain is killer!
#001 (LP-1S) [finished - co-runner up Nov 2018 GOTM]
#002 (WL-1)
#003 (MPL Megacaster - semi scratch build) [finished]
#004 (ST-1 JR - Arachnoid Superhero build) [finished]
#005 (LP jr)
#006 (TL-1A)
Junk shop acoustic refurbs (various)
'The TGS Special'

Kick, what I do is , on the overlap I fold the tape back under itself on one edge, so the "top" is also in contact withthe layer underneath. If you press down hard it stays in place, I've not had any troubles doing it this way
Build 19 PSH-1 Kustom
Build 18 HB-4S Kustom
Build 17 WL-1 Kustom
Build 16 TL-1TB Kustom
Build 15 PBG-2-
Build 14 FTD-1
Build 13 RD-1 Kustom
Build 12 DM-1S
Build 11 MKA-2 -
Build 10 Basic strat
Build 9 JM Kustom
Build 8 FV-1G
Build 7 ES-2V
Build 6- Community prototype
Build 5 LP-1LQ
Build 4 ES-5V
Build 3 JR-1
Build 2 GD-1
Build 1 TLA-1

Do you have multimeter? You cound just test the conductivity across the cavity from place to place.
cheers,
Gav.
--
Build #01: BC-1
Build #02: ST-1
Build #03: JR-1DC
Build #04: ES-2V
Build #05: ESB-4 (GOTM July 2014)
Build #06: RC-1
Build #07: MK-2
Build #08: TLA-1
Build #09: JR-1DC
Build #0A: LPA-1
Build #0B: STA-1 (GOTM April 2015)
Build #0C: MKA-2
Build #0D: LP-1M
Build #0E: JB-1
Build #0F: FS-1
Find me:
https://www.facebook.com/firescreek.guitars/
http://www.guitarkitbuilder.blogspot.com.au/
@Dedman: that is a simple and effective solution. I'll do the same when I am gonna shield mine.
@Gavin: I do have a multimeter so I can check.
Sorry for the question in your topic Woolley
Nr 1: Red Widow LP-1MQ (Finished) ->Diary<-
No apologies required - all good stuff. I never thought of folding over the edges - top tip.
However I managed to get continuity across the whole lot anyway, maybe my adhesive is conductive.
Sadly I got a splash of other stain on it so I had to do a cover up. See further on...
Top pretty much done now.
Had some issues (this is my first ever so I expected learning to occur quite heavily) - some water got under the veneer I think, most noticeable around the tone control hole. Seems I must have sanded away the stain on the top horn a bit too.
Quite a decent gloss finish overall though despite me using a dreadful acrylic varnish which proved very hard work.
 Posting Permissions

 Reply With Quote