
Aways. Got auto save configured for every 5 mins :-)


Aways. Got auto save configured for every 5 mins :-)
Week 4:
Not much can be done this weekend, only going to be putting the intensifying DT coat on. Wondering what I could do before that to knock something else off I decided to fit the tuners, mark them up and pre drill the screw holes.
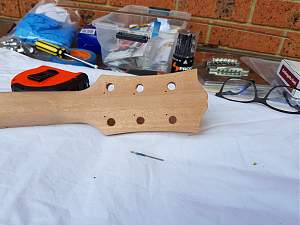
Question while I'm playing around with the neck. I did kind of expect the bone nut to fit the neck.
It's the best part of 2mm too wide. I take it it calls for some very careful sanding, taking the same amount of each side. Nervous!
DingoTone Intensifier coat.
Before
Headstock done
Both done


Regarding the nut, the overhang accommodates variations in neck width and allows you to tweak its position side to side slightly to get the outside strings sitting where you want them relative to the fretboard edge. When it comes to stringing up for the first time don't glue the nut in place, just let the string tension hold it. Nudge it side to side as needed until you get the position you want, then use a pencil to mark the edges of the fretboard on it.
Then you can remove the nut and file and sand down so the width matches perfectly. Do it slowly and carefully as the edge of the bone can sometimes splinter a bit if you're too rough.
Scott.
Thanks for that. Great tip.

If you ever do need to file or sand the nut in-situ, always mask up the surrounding neck first. You might think you can get away with it, but you'll slip or not realise what you're doing, and you will mark the neck or the fretboard. I've done it myself.

Damn that intensifying coat is i n t e n s e
Build #1 - ST-1 - Completed
Build #2 - LP-1SS - Completed
Build #3 - TLA-1R - Completed
Build #4 - SGD-612 - Completed
Build #5 - ES-1G - Completed
Build #6 - STA-1HT | Completed
Build #7 - ST1JR - Completed
Current Build #8 - JBA-4
Build #9 - Semi-scratch build Tele x 2 - Completed
Current Build #10 - PRS-1H
Current Build #11 - AGJR-1 - Completed
Current Build #12 - ATL-1SB
Current Build #13 - GST-1
Current Build #14 - FBM-1

Rossco that is looking insanely good. Keep up the good work !
Current Builds and status
scratch end grain pine tele - first clear coat on !
JBA-4 - assembled - final tweaks
Telemonster double scale tele - finish tobacco burst on body and sand neck
Completed builds
scratch oak.rose gum Jazzmaster - assembled needs setup
MK-2 Mosrite - assembled - play in
Ash tele with Baritone neck - neck pup wiring tweaks and play in
Cheers guy's. Start the finishing coats this weekend.
 Posting Permissions

 Reply With Quote