Page 15 of 19 FirstFirst ... 5 13 14 15 16 17 ... LastLast
Results 141 to 150 of 183

Thread: TL-1TB Telebilly

  1. #141
    Polished, a touch of gloss.

    Click image for larger version. 

Name:	TL_1TB_249_polish_4.jpg 
Views:	415 
Size:	198.7 KB 
ID:	17773

    Click image for larger version. 

Name:	TL_1TB_250_polish_5.jpg 
Views:	430 
Size:	194.4 KB 
ID:	17775

    Click image for larger version. 

Name:	TL_1TB_250_polish_6.jpg 
Views:	406 
Size:	107.0 KB 
ID:	17774

    Click image for larger version. 

Name:	TL_1TB_251_polish_7.jpg 
Views:	410 
Size:	278.8 KB 
ID:	17776
    Scott.

  2. #142
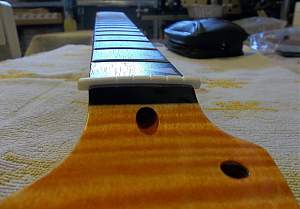
    The fret board was dry and pale after two years of hanging. I wanted it to have the dark rich rosewood look so instead of using Dingowax I reverted to Dr. Ducks Ax Wax for this build.

    Click image for larger version. 

Name:	TL_1TB_244_dr_ducks_1.jpg 
Views:	427 
Size:	234.8 KB 
ID:	17777

    Two applications over two days. Yummy.

    Click image for larger version. 

Name:	TL_1TB_245_dr_ducks_2.jpg 
Views:	399 
Size:	193.8 KB 
ID:	17778

    Time to rough out a nut.

    Slots marked and initially cut with a fine 0.010" saw.

    Click image for larger version. 

Name:	TL_1TB_252_nut_cut_1.jpg 
Views:	434 
Size:	239.1 KB 
ID:	17779

    Rough down the shape with a file.

    Click image for larger version. 

Name:	TL_1TB_253_nut_cut_2.jpg 
Views:	419 
Size:	210.1 KB 
ID:	17780
    Scott.

  3. #143
    Slots filed. The B looks wider because I used a V cut file for it and flat files for the G and e.

    Click image for larger version. 

Name:	TL_1TB_254_nut_cut_3.jpg 
Views:	407 
Size:	203.8 KB 
ID:	17781

    Close enough for now, will finalise after set up.

    Click image for larger version. 

Name:	TL_1TB_255_nut_cut_4.jpg 
Views:	413 
Size:	140.4 KB 
ID:	17782

    Click image for larger version. 

Name:	TL_1TB_256_nut_cut_5.jpg 
Views:	406 
Size:	191.0 KB 
ID:	17783
    Scott.

  4. #144
    Shielding cavities.

    Click image for larger version. 

Name:	TL_1TB_257_shielding_1.jpg 
Views:	434 
Size:	343.4 KB 
ID:	17784

    Click image for larger version. 

Name:	TL_1TB_258_shielding_2.jpg 
Views:	400 
Size:	284.2 KB 
ID:	17785

    Seams soldered, cavities linked via wires and bridge ground wire added ready for the bridge post bushings. Testing continuity to ensure it's all linked and working.
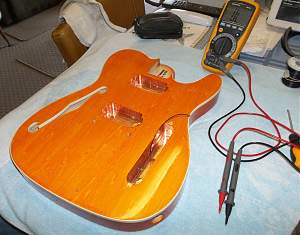
    Click image for larger version. 

Name:	TL_1TB_259_shielding_3.jpg 
Views:	411 
Size:	279.1 KB 
ID:	17786
    Scott.

  5. #145
    Normally I'd install the pickups and wiring later, but because of the tightness of the cavity etc. I decided to do it before the rest of the hardware.

    Pickups in.

    Click image for larger version. 

Name:	TL_1TB_261_wiring_1.jpg 
Views:	389 
Size:	331.8 KB 
ID:	17787

    Pickup leads connected to the control plate I wired earlier in the build. It's going to be a tight squeeze. You can also see that I've put some heat shrink on the arm of the jack so it can't short onto the shielding in the jack cavity.

    Click image for larger version. 

Name:	TL_1TB_262_wiring_2.jpg 
Views:	411 
Size:	269.5 KB 
ID:	17788

    Word of advice: cover the body completely, like I have, if you are ever soldering near/on it like this as tiny solder flecks will splatter under heat and inevitably burn into your finish and/or plastics.

    Tap test on the pickups… it's alive and appears to be all working. Considering how tightly everything is packed/squeezed/jammed into that cavity, that's a miracle.
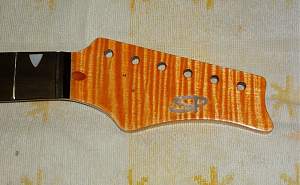
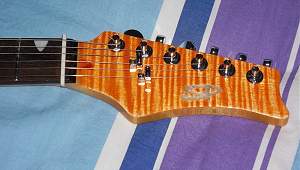
    Click image for larger version. 

Name:	TL_1TB_263_wiring_3.jpg 
Views:	408 
Size:	327.3 KB 
ID:	17789

    Headstock bling.

    Click image for larger version. 

Name:	TL_1TB_264_headstock_bling.jpg 
Views:	404 
Size:	129.1 KB 
ID:	17790
    Scott.

  6. #146
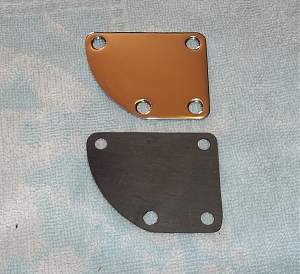
    Using my drill press to push in the bridge post bushings.

    Click image for larger version. 

Name:	TL_1TB_265_press_bushings_1.jpg 
Views:	416 
Size:	310.8 KB 
ID:	17791

    Click image for larger version. 

Name:	TL_1TB_266_press_bushings_2.jpg 
Views:	403 
Size:	250.1 KB 
ID:	17792

    Checking that I've got good continuity from the bushing through the ground wire to the plate/shielding.

    Click image for larger version. 

Name:	TL_1TB_267_press_bushings_3.jpg 
Views:	406 
Size:	262.0 KB 
ID:	17793

    I didn't have a plastic seat for my curved neck plate but I wanted one for this to protect the basswood and Tru-Oil combo, so i made an un-edged one from a standard seat. It'll do.

    Click image for larger version. 

Name:	TL_1TB_268_curved_plate_seat.jpg 
Views:	397 
Size:	125.5 KB 
ID:	17794
    Scott.

  7. #147
    Neck on and alignment initially checked with a fishing line centreline.

    Click image for larger version. 

Name:	TL_1TB_269_checking_neck_align_1.jpg 
Views:	431 
Size:	225.0 KB 
ID:	17795

    Hello Mr. Bigsby.

    Click image for larger version. 

Name:	TL_1TB_271_bigsby_fitted.jpg 
Views:	399 
Size:	254.6 KB 
ID:	17796

    The die is cast.

    Click image for larger version. 

Name:	TL_1TB_272_assembled_1.jpg 
Views:	407 
Size:	399.1 KB 
ID:	17797
    Scott.

  8. #148
    I'm not sure on the dice knobs as yet. Apart from the cheese factor the binding now has a slight aged/yellowed look from the Tru-Oil so the knobs don't match as well as when the binding was white. I've got some standard chrome knobs and a chrome tip if they annoy me too much. Still need to do some tweaking and final set up, but here are some assembled pics for now. Very difficult to get photos that actually show the grain on the top.

    Click image for larger version. 

Name:	TL_1TB_273_assembled_2.jpg 
Views:	377 
Size:	370.6 KB 
ID:	17798

    Click image for larger version. 

Name:	TL_1TB_274_assembled_3.jpg 
Views:	395 
Size:	171.1 KB 
ID:	17799

    Click image for larger version. 

Name:	TL_1TB_275_assembled_4.jpg 
Views:	401 
Size:	144.9 KB 
ID:	17800

    Click image for larger version. 

Name:	TL_1TB_276_assembled_5.jpg 
Views:	401 
Size:	258.6 KB 
ID:	17801
    Scott.

  9. #149
    Click image for larger version. 

Name:	TL_1TB_277_assembled_6.jpg 
Views:	395 
Size:	303.6 KB 
ID:	17802

    Click image for larger version. 

Name:	TL_1TB_278_assembled_7.jpg 
Views:	408 
Size:	289.4 KB 
ID:	17803

    I only got it assembled yesterday so it's still bedding in. The sound from the Surf 90's is actually better than I expected, and the wiring works pretty well (if I may say so myself). If anything, I think I'd like a touch more bass cut from the TBX, but only a tiny amount. It thins the sound slightly without making it tinny or ice-picky (you notice it most with a bit of dirt on), but I think a hint more cut would make it more flexible. Early days.

    I wasn't going to use a pickguard on this, but now I'm thinking I may make a small clear one just to protect the finish a bit, given that Tru-Oil isn't particularly robust. I think a clear mini pickguard would look ok. We'll see.

    The build is still fighting me… I got up this morning to find the high e had mysteriously snapped overnight, right at the locking tuner and not leaving enough string to re-thread it. Change in temperature I guess. It was only the old kit supplied bundle of strings, so no great loss, but I replaced it with an old used e just in case it wasn't a flaw in the string.

    I'll post some better pics once it's set up and finalised.
    Last edited by WeirdBits; 06-03-2017 at 09:03 AM.
    Scott.

  10. #150
    Member Hobastard's Avatar
    Join Date
    Jan 2017
    Location
    Hobart Tasmania
    Posts
    436
    Love the Guitar, Hate the Knobs..... Sorry, just my opinion.....

Page 15 of 19 FirstFirst ... 5 13 14 15 16 17 ... LastLast

Posting Permissions

  • You may not post new threads
  • You may not post replies
  • You may not post attachments
  • You may not edit your posts
  •