Page 14 of 19 FirstFirst ... 4 12 13 14 15 16 ... LastLast
Results 131 to 140 of 183

Thread: TL-1TB Telebilly

  1. #131
    I wanted to continue with Dingotone on the build, but the beta top coat had turned to sludge long ago. The Mk.1 neck top coat, however, amazingly still looked ok after two years. A bit thicker perhaps but possibly still usable. I gave it a test on some scrap and it seemed good so I decided to risk it on both the neck and the body.

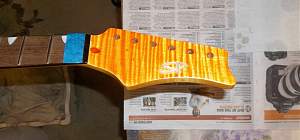
    The binding had already been scraped so many times I didn't think it (or me) could handle another heavy scraping. So, I went with tape on the side of the binding hoping that I'd just have to clean up the top edge if at all.

    Click image for larger version. 

Name:	TL_1TB_227_trying_tape.jpg 
Views:	436 
Size:	177.0 KB 
ID:	17740

    The neck top coat went on thicker than I hoped, but looked pretty good and was surprisingly nice and smooth. I was amazed it still seemed ok after so much time.

    Click image for larger version. 

Name:	TL_1TB_228_body_6th_neck_tc_1.jpg 
Views:	435 
Size:	245.8 KB 
ID:	17741

    Click image for larger version. 

Name:	TL_1TB_229_body_6th_neck_tc_2.jpg 
Views:	454 
Size:	199.8 KB 
ID:	17742

    Click image for larger version. 

Name:	TL_1TB_230_neck_6th_neck_tc_1.jpg 
Views:	439 
Size:	125.3 KB 
ID:	17743

    Click image for larger version. 

Name:	TL_1TB_231_neck_6th_neck_tc_2.jpg 
Views:	441 
Size:	148.9 KB 
ID:	17744
    Scott.

  2. #132
    I checked it after 7 days drying and it was looking smooth and surprisingly glossy. I was well pleased. There had been some increased humidity the previous few days so I checked it again on day 8 and it had changed completely. In 24hrs it had gone from looking nice and smooth to an absolute train wreck… it looked like someone had taken a fresh piece of 120 grit and sloughed off huge swathes of the finish.

    Click image for larger version. 

Name:	TL_1TB_232_day_8_disaster_1.jpg 
Views:	464 
Size:	157.9 KB 
ID:	17745

    Click image for larger version. 

Name:	TL_1TB_233_day_8_disaster_2.jpg 
Views:	446 
Size:	89.9 KB 
ID:	17746

    It was like the surface tension had broken and the finish had just fallen away. There was a little orange on the edge of the binding but no drips, drops, or runs, it was strange. The finish had gone from being smooth and glossy to a tacky, rough, patchy mess. My own fault for using the old finish.

    More to come.
    Scott.

  3. #133
    GAStronomist wokkaboy's Avatar
    Join Date
    Dec 2012
    Location
    Perth WA
    Posts
    13,555
    looking good Weirdy, so looks like you are on the home stretch !
    Current Builds and status
    scratch end grain pine tele - first clear coat on !
    JBA-4 - assembled - final tweaks
    Telemonster double scale tele - finish tobacco burst on body and sand neck

    Completed builds
    scratch oak.rose gum Jazzmaster - assembled needs setup
    MK-2 Mosrite - assembled - play in
    Ash tele with Baritone neck - neck pup wiring tweaks and play in

  4. #134
    Sadly Wokks, things were a bit pear-shaped as of my previous post.
    Scott.

  5. #135
    Mentor Kick's Avatar
    Join Date
    Feb 2017
    Location
    Amsterdam, The Netherlands
    Posts
    823
    Nice work!!
    Nr 1: Red Widow LP-1MQ (Finished) ->Diary<-

  6. #136
    GAStronomist Simon Barden's Avatar
    Join Date
    Oct 2016
    Location
    Reading, UK
    Posts
    10,547
    Interesting sequence of events. Any thoughts on what you'll do? it doesn't look like the finish is ever going to settle down.

    It looks like people have used Tru-Oil over DT before. Is it worth trying that over the DT to try and seal it?

  7. #137
    Yeah interesting is one way to describe it. Stay tuned Simon, further updates to follow.
    Scott.

  8. #138
    After the debacle of the last top coat I left it to dry for another three weeks in the hopes the finish would lose some its tackiness and harden, at least a little. Sadly, neither occurred and it was pretty much just as sticky and nasty as it was on day 8. I love the orange colour and the way it has worked on the grain, so I was determined to try to save the finish if at all possible.

    The stickiness of the finish meant the only option was wet sanding, but I couldn't use water as the wood wasn't really sealed. That meant using a solvent to wet sand. I normally use White Spirits when sanding Tru Oil, but with the volatility of the orange I was worried it would either rub off/dissolve too much of the colour or spread it around and stain everything (including the binding). In the end I decided to try wet sanding with metho, as the most benign solvent I had, in the hope that it would minimise the impact on the colour while still lubricating the sanding. The finish, despite its problems, was still pretty thin so to preserve as much of it as possible I stuck with 1200 grit. It would make things slow but I hoped it would be worth it.

    Even just using metho for the wet sanding still had the orange flying in all directions. It was basically sand an area with metho, mop it up, repeat. Slow and messy, with lots of orange.

    Click image for larger version. 

Name:	TL_1TB_234_metho_wetsand_cleanup.jpg 
Views:	431 
Size:	347.4 KB 
ID:	17761

    Eventually I was able to undo most of the fouled top coat damage and get things reasonably smooth. I had to scrape the binding again to get rid of some staining from the orang'ified metho, but only lightly. As much as I wanted to stick with Dingotone on the build, the orange colour was still just too mobile to risk another failed top coat. So, reluctantly, I decided to switch to Tru-Oil to seal it once and for all.

    First coats of Tru-Oil.

    Click image for larger version. 

Name:	TL_1TB_235_body_1st_truoil_1.jpg 
Views:	459 
Size:	171.4 KB 
ID:	17762

    Click image for larger version. 

Name:	TL_1TB_236_body_1st_truoil_2.jpg 
Views:	439 
Size:	192.7 KB 
ID:	17763

    Click image for larger version. 

Name:	TL_1TB_237_headstock_1st_truoil.jpg 
Views:	441 
Size:	133.2 KB 
ID:	17764

    After the first couple of coats I took the tape off the binding, as the orange seemed to be stable for now. From then on I was going to apply Tru-Oil over the binding as well, it meant it would yellow it slightly but it seemed like the safest option.
    Scott.

  9. #139
    After 8 coats of Tru-Oil on the body and headstock it was starting to look a bit glossy and was ready for its first metho (yes, I kept using metho) wet sanding.

    Click image for larger version. 

Name:	TL_1TB_238_body_8th_truoil_1.jpg 
Views:	421 
Size:	175.0 KB 
ID:	17765

    Click image for larger version. 

Name:	TL_1TB_239_body_8th_truoil_2.jpg 
Views:	436 
Size:	195.6 KB 
ID:	17766

    Fifth coat of TO on the neck.

    Click image for larger version. 

Name:	TL_1TB_240_neck_5th_truoil_1.jpg 
Views:	427 
Size:	228.7 KB 
ID:	17767

    Click image for larger version. 

Name:	TL_1TB_242_neck_5th_truoil_3.jpg 
Views:	445 
Size:	206.1 KB 
ID:	17768
    Scott.

  10. #140
    In the end I did around 14 full strength Tru-Oil coats on the body and headstock face and then a stack of 50/50 White Spirits mix coats. The neck got around 8 full strength and another 8 50/50 coats.

    Even the Tru-Oil coats fought me on the body. For some reason there'd always be some muck or bits showing up when applying it. It never happened on the neck, despite using the same fabric and same Tru-Oil/mix, same time and application method. So, there was something about the body, maybe the cavities or the binding, that was causing it. It didn't matter if I did the body first or neck first but it always seemed to happen.

    Left the body and neck for a couple of weeks to harden.

    Click image for larger version. 

Name:	TL_1TB_243_body_20th_truoil.jpg 
Views:	433 
Size:	157.6 KB 
ID:	17769

    I gave it all a very light final wet sand with White Spirits and then a bit of a polish. It was probably a little glossier before the sand and polish process, but it needed it to get rid of a few lumps etc.

    Click image for larger version. 

Name:	TL_1TB_246_polish_1.jpg 
Views:	428 
Size:	247.5 KB 
ID:	17770

    Click image for larger version. 

Name:	TL_1TB_247_polish_2.jpg 
Views:	426 
Size:	222.5 KB 
ID:	17771

    Click image for larger version. 

Name:	TL_1TB_248_polish_3.jpg 
Views:	423 
Size:	225.3 KB 
ID:	17772
    Scott.

Page 14 of 19 FirstFirst ... 4 12 13 14 15 16 ... LastLast

Posting Permissions

  • You may not post new threads
  • You may not post replies
  • You may not post attachments
  • You may not edit your posts
  •