Page 13 of 19 FirstFirst ... 3 11 12 13 14 15 ... LastLast
Results 121 to 130 of 183

Thread: TL-1TB Telebilly

  1. #121
    How soon we forget, Wokks Volume only/Volume & TBX/Volume, TBX & Treble Cut
    Scott.

  2. #122
    Mentor ozzbike's Avatar
    Join Date
    Aug 2014
    Location
    Sunshine Coast, Queensland
    Posts
    1,109
    Oh you have to finish this. This has been the most intense and informative build diary I have followed. Lots of great ideas, with lots of great tips on how to achieve them.

    She is a weapon of beauty and we need to hear her sing to our souls. Scott plug in your desire to hear her play and make it so. Man she needs to breath......this girl is gonna wail.

  3. #123
    Updates probably aren't too far away Ozz.
    Scott.

  4. Liked by: ozzbike

  5. #124
    So, where were we...

    Well, it's been a while so I guess I better see if I can get this one over the line. Plus, Wokka has been fretting for an update for long enough.

    Quick summary for new players:

    • Build started October 2014
    • Testing an early Beta version of Dingotone orange (already 6 months old when I got time to test it)
    • TL-1TB kit had some glue issues and needed some tweaking
    • Re-bound body with white binding and bound F-hole
    • Re-drilled and counter-bored tuner holes
    • Shaped body for curved neck plate
    • Thinned neck profile
    • Plugged and re-drilled bridge post holes for roller bridge
    • Adjusted neck pocket to slightly increase neck angle
    • Replaced side dots with white MOP
    • Added headstock flamed maple veneer
    • White MOP headstock inlay
    • The usual thread jacking shenanigans from Wokka
    • Modified Surf 90 pickups for 4-way switching
    • Custom wiring (diagram) with:
      • Surf 90 pickups with Tele 4-way switching (bridge, bridge + neck parallel, bridge + neck series, neck)
      • Neck phase reversal push/pull
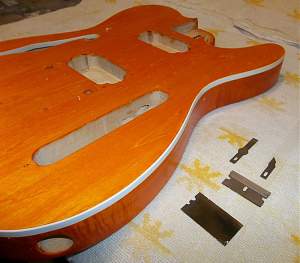
      • Modified Fender TBX tone control (bass cut <-0->treble cut)
      • Treble cut filter cap with On/On/On switch (Volume only, Volume & TBX, Volume & TBX & Treble cut)
      • Overconfidence and ambition to try and fit it all into a standard Tele cavity

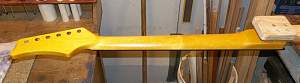
    • One stain coat of Dingotone Beta orange on body and headstock face
    • Two Intensifier coats of Dingotone Beta on body and headstock face
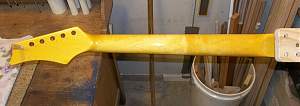
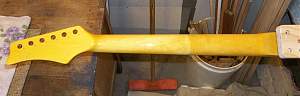
    • Colortone vintage amber mix stain on neck
    • Two coats of Dingotone Mk.1 clear neck stain 'base' on neck
    • The beta orange really stains binding, and I mean really. Much scraping of binding! But I love the colour
    • First beta top coat on body

    And that's where this build diary paused, briefly (about 2 years and 4 months ago)… and Wokka's nagging started.

    The build didn't actually stop at that point, I was still applying the finish, I just didn't get around to an update before the build did pause. To finish the initial catch-up, here's the rest of the finishing I did two years ago.

    The beta orange was proving to be very volatile even after plenty of drying time. It seemed to re-activate when applying my top coats and quickly stained my cloth.

    Click image for larger version. 

Name:	TL_1TB_201_cloth_stain.jpg 
Views:	324 
Size:	125.2 KB 
ID:	17715

    First coat of early Mk.1 neck top coat applied.

    Click image for larger version. 

Name:	TL_1TB_202_neck_top_coat.jpg 
Views:	333 
Size:	91.2 KB 
ID:	17716
    Scott.

  6. #125
    The beta top coats were looking good, but patchy.

    Click image for larger version. 

Name:	TL_1TB_203_headstock_top_coat.jpg 
Views:	319 
Size:	191.0 KB 
ID:	17717
    Click image for larger version. 

Name:	TL_1TB_204_body_patchy_1.jpg 
Views:	327 
Size:	171.4 KB 
ID:	17718
    Click image for larger version. 

Name:	TL_1TB_205_body_patchy_2.jpg 
Views:	310 
Size:	172.2 KB 
ID:	17719

    Click image for larger version. 

Name:	TL_1TB_206_body_edge.jpg 
Views:	346 
Size:	163.4 KB 
ID:	17720

    You can see the binding was taking on colour again from applying the clear top coat.
    Scott.

  7. #126
    Third top coat dry, looking good and the patchiness is slowly improving.

    Click image for larger version. 

Name:	TL_1TB_207_body_3rd_tc_1.jpg 
Views:	365 
Size:	195.4 KB 
ID:	17721

    Click image for larger version. 

Name:	TL_1TB_208_body_3rd_tc_2.jpg 
Views:	336 
Size:	213.2 KB 
ID:	17722

    Binding scraped, yet again, ready for 4th top coat.

    Click image for larger version. 

Name:	TL_1TB_209_binding_scraped_prep_pre4.jpg 
Views:	337 
Size:	254.8 KB 
ID:	17723


    Fourth neck top coat.

    Click image for larger version. 

Name:	TL_1TB_210_neck_4th_tc.jpg 
Views:	326 
Size:	112.7 KB 
ID:	17724
    Scott.

  8. #127
    Fourth top coat on body.

    Click image for larger version. 

Name:	TL_1TB_211_body_4th_tc_1.jpg 
Views:	323 
Size:	199.8 KB 
ID:	17725

    Click image for larger version. 

Name:	TL_1TB_212_body_4th_tc_2.jpg 
Views:	325 
Size:	225.7 KB 
ID:	17726

    It was going on well and looking pretty good. But, then we had a couple of days of higher humidity and the finish took a turn. Coat #4 went from smooth and nice to coarse, rough and lumpy over a couple of days.

    Click image for larger version. 

Name:	TL_1TB_213_body_patchy_rough_1.jpg 
Views:	331 
Size:	133.3 KB 
ID:	17727

    Click image for larger version. 

Name:	TL_1TB_214_body_patchy_rough_2.jpg 
Views:	338 
Size:	150.8 KB 
ID:	17728

    (second image is without flash to get the contrast to show how rough it was)
    Scott.

  9. #128
    I couldn't risk wet sanding with water to clean up the roughness, not enough protection for the wood. And, with the volatility of the orange I couldn't risk using a solvent to sand, so I had to go with dry 1200 wet'n'dry. I just wanted to smooth out the finish without taking off any more of the top coat (or orange) than necessary… but the paper was still stained very orange. With time and caution it was eventually smooth again.

    Click image for larger version. 

Name:	TL_1TB_215_smoothing_orange_paper.jpg 
Views:	338 
Size:	198.9 KB 
ID:	17729

    But it meant more orange moving around with the next top coat.

    Click image for larger version. 

Name:	TL_1TB_216_5th_tc_rags.jpg 
Views:	320 
Size:	112.6 KB 
ID:	17730

    Fifth top coat, or replacement of #4 really. Back to a nice smooth finish.

    Click image for larger version. 

Name:	TL_1TB_217_body_5th_tc_1.jpg 
Views:	359 
Size:	190.5 KB 
ID:	17731

    Click image for larger version. 

Name:	TL_1TB_218_body_5th_tc_2.jpg 
Views:	333 
Size:	167.3 KB 
ID:	17732

    Neck was still doing ok.

    Click image for larger version. 

Name:	TL_1TB_219_neck_5th_tc.jpg 
Views:	337 
Size:	105.3 KB 
ID:	17733
    Scott.

  10. #129
    Although the body was mostly smooth again with the 5th top coat, the patchiness was still occurring. Hard to photograph clearly, so I took some shots without the flash. You can just see the patchy/streaky sections scattered across the body, and it was pretty much the same on the headstock face.

    Click image for larger version. 

Name:	TL_1TB_220_body_patchy_1.jpg 
Views:	309 
Size:	188.6 KB 
ID:	17734

    Click image for larger version. 

Name:	TL_1TB_221_body_patchy_2.jpg 
Views:	312 
Size:	179.3 KB 
ID:	17735

    And, that's where I had to put the build aside two years ago. I was planning to let it dry for an extended period to see if that would improve the patchiness, but then life got in the way and it kept getting pushed aside (while also gathering a layer of dust).

    *** time passes ***
    Scott.

  11. #130
    Twenty-six months later…

    While working on my YB-4 build I had a look at the TL-1TB's neck, and sighting down it something didn't look right. I was worried that it may have warped a bit while it had been hanging, but it looked more like a couple of frets may have just lifted slightly from all the temp and humidity changes over the long years of neglect. It was time it had some attention.

    I re-pressed the frets to sort out any raised ones and gave it a light level to get it back where it should be. Black marker is a high spot, red everywhere else.

    Click image for larger version. 

Name:	TL_1TB_223_re-level_frets_1.jpg 
Views:	347 
Size:	176.1 KB 
ID:	17736

    Re-crowned, cleaned-up and polished.
    Click image for larger version. 

Name:	TL_1TB_224_re-level_frets_2.jpg 
Views:	327 
Size:	226.1 KB 
ID:	17737

    Click image for larger version. 

Name:	TL_1TB_225_re-level_frets_3.jpg 
Views:	326 
Size:	130.8 KB 
ID:	17738

    The binding was still stained from the last top coat application two years ago, so to start fresh I scraped the binding yet again (probably for the 7th time, or more, time).

    Click image for larger version. 

Name:	TL_1TB_226_steel_wool_scrape.jpg 
Views:	327 
Size:	262.6 KB 
ID:	17739
    Last edited by WeirdBits; 05-03-2017 at 05:56 AM.
    Scott.

Page 13 of 19 FirstFirst ... 3 11 12 13 14 15 ... LastLast

Posting Permissions

  • You may not post new threads
  • You may not post replies
  • You may not post attachments
  • You may not edit your posts
  •