
Yep, 8.58am now, Woks. I had noticed there weren't that many posts when I first looked.
Paint on screw threads isn't going to make the bridge easy to intonate either. All depends on how much G-Axe sprayed and whether he masked anything off.


Yep, 8.58am now, Woks. I had noticed there weren't that many posts when I first looked.
Paint on screw threads isn't going to make the bridge easy to intonate either. All depends on how much G-Axe sprayed and whether he masked anything off.

Okay, so it's been a busy few days.
Tuesday arvo I slapped on some Zinssers, let it dry, sanded back, gave it another coat and let it dry overnight.
Wednesday I got stuck into the sanding in a big way, and got it to a reasonable standard. A few visible dents and scratches, but I'm working to a deadline - so near enough is good enough. I sprayed a few coats of a nice regency red "pearl" rattlecan onto the body, taped and hung the neck to give it more of the same. At this point I'm pretty happy with the colour and sheen that the paint has. (no photos at this stage - anytime I wanted to take some snaps it was either too dark, or my phone was dead. :/)
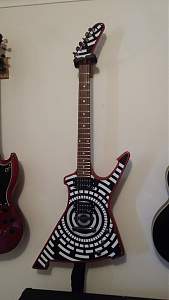
So I push on, and around midnight, after a few hours to cure (yeah, I know) I sat down with one of my vinyl decals. My estimations were pretty good, the bridge and tail positions are slightly different to my original estimations, so I can't quite align the centre of the pattern between the two, but it still looks the goods. Happy with the position, I take off the backing and slowly and meticulously stick it on, smoothing out the bubbles and trimming the edges as I go. I trim around the neck pocket, poke holes for the bridge and test string the neck. Happy with the alignment and scale length, I glue it in, and leave it there for the night.
Thursday I didn't progress much. Between a bit of bronchitis, spending time with the family and rehearsal I only really managed to put together my "purfling cutter" - a length of 70x35mm treated pine with a bolt and spacer from a washing machine, and a scalpel blade nailed to the side of it. I wanted to basically cut the vinyl off about 6mm in from the edge of the guitar so it has a red border (see hte later pictures if that doesn't make sense) The idea was good, the execution not amazing - I left too much flex in the blade, so it was harder to maintain an even distance from the edge around the curves. So in the end, I used it for the straight lines, and cut the curves freehand.
Like anything with this build, it doesn't fare well under close scrutiny but looks pretty good from a distance. The cut was mostly clean, with a couple of ragged edges. Far more concerning was the entirely foreseeable lifting of paint as I pulled away the excess vinyl. I grabbed a scrap and sprayed a bit of paint onto it, hoping that I might be able to just wipe any overspray off the the vinyl. I'm partly right, because it does just wipe off, but also reacts with the black ink on the decal, which also wipes off. No go. So I stick on some trusty blue masking tape, and confirm that it pulls up without damaging the decal.
Friday I pick up where I left off. Nearly. My pickup rings arrived in the post on Thursday, and as I'm figuring out which is the neck and which is the bridge, I notice that the fretboard is poking halfway into the pickup cavity (something I was plainly aware of well in advance from reading other EX-1 build diaries, but apparently forgot until after I'd glued the neck.)
So, not wanting to run a router over it without a some sort of jig/guide, and not wanting to invest the time to creating said jig/guide - I grab my forstner bits and drill out a quarter inch worth of fretboard/neck. I used a small one for the initial drilling, and a bigger one like a router bit to smooth off the edge.
Not the prettiest solution, but one that will keep things moving, and most of the ugliness will be hidden by the pickup ring. So in the photo, you can see where the paint has flaked away, and my feeble attempts to fix it by spraying some paint into a shot glass and touching it up with a little brush.
That just wasn't going to work, so I mask up the whole thing, and spray to cover the bit of the neck I'd left unpainted as a glue surface, as well as the bits that had flaked away when the vinyl came up.
Once it's touch dry, the mask comes off, and the hardware goes in. I use the drill press to push in the bushings, and use a multimeter to ensure continuity through the painted tail (thanks Simon for the hint on that - I had to scrape back some paint where the tail contacts the post.)
The pickups go in, and so do the tuners - tomorrow I just need to finish the wiring, string it up and set up the intonation/relief. As it stands, there's a bit of back bow in the neck, which might come up under tension, but I suspect I'll be giving the truss rod a work out.
Barring some catastrophic failure in the wiring, or a neck that pops out once I put some tension on it - I might actually have this thing ready for tomorrow night. It will never stand up to close scrutiny, and will probably end the night with the vinyl lifting and half the paint missing - but after a few beers who's going to notice?
Last edited by G-Axe; 20-01-2017 at 08:49 PM.
So I got it done.
Saturday was a pretty hectic day. The morning was taken up with my son's birthday party, and pretty much as soon as that had wrapped up, I took the time to string it up - thankfully the neck stayed put. I adjusted the back bow out of the neck, and discovered the angle is very slightly off - the action is exactly where I want it with the bridge posts all the way in, but ideally it should be able to be lower. Not a big deal, just very relieved that it wasn't worse!
So after spending most of the week freaking out about everything that didn't go to plan, I can't really describe the elation of plugging it into my amp and hearing some noise. Then there was another moment of freaking out because my good leads were packed up and the cheapie I was using was a bit loose and losing contact with the sheath of the jack. I rattled it around until it got consistent contact, then rushed through setting the intonation - all of the strings were pretty close, which was fortunate because the low bridge made the adjustment screws a bit fiddly to work with.
So then before I knew it I was rushing out the door with a carload of gear, setting up, and playing a gig with a guitar I'd built myself. Pretty hard to top that feeling. I ended up using it pretty much exclusively too, because I managed to forget my bass and ended up running the guitar through an octave pedal for my bass parts.
Here it is "finished". Soon I'll take all the hardware back off and try to get some clear coats on, but I'll try to get some audio samples first. Also, I'll post some gig photos - just have to pinch my wife's phone, or work out how to save things from Whatsapp.

One trick when masking over fresh paint, forgive me if you already did, is to run the tape over your jeans, or similar, to make it a bit less sticky. Comes off much easier.... A trick I learned painting checkered tails on Jet Fighters back in the seventies......
Good tip, I'll keep that in mind next time I'm rushing through a build - although the plan for the next one is to take my time and try and get the finish immaculate. Out of curiosity, would it have been Mirages back in those days? Or were there still a few Sabres kicking around?

I think the vinyl decal adds a nice contrast mate.

The design looks killer! I wish I had the skill and patience to pull something like this off. Very well done.
cheers,
Gav.
--
Build #01: BC-1
Build #02: ST-1
Build #03: JR-1DC
Build #04: ES-2V
Build #05: ESB-4 (GOTM July 2014)
Build #06: RC-1
Build #07: MK-2
Build #08: TLA-1
Build #09: JR-1DC
Build #0A: LPA-1
Build #0B: STA-1 (GOTM April 2015)
Build #0C: MKA-2
Build #0D: LP-1M
Build #0E: JB-1
Build #0F: FS-1
Find me:
https://www.facebook.com/firescreek.guitars/
http://www.guitarkitbuilder.blogspot.com.au/

looks unreal G-Axe love the vinyl pattern on the front. You finished it in no time. Good advice next build take it slower !
Current Builds and status
scratch end grain pine tele - first clear coat on !
JBA-4 - assembled - final tweaks
Telemonster double scale tele - finish tobacco burst on body and sand neck
Completed builds
scratch oak.rose gum Jazzmaster - assembled needs setup
MK-2 Mosrite - assembled - play in
Ash tele with Baritone neck - neck pup wiring tweaks and play in
Thanks very much for the kind words, Cade, Gavin and Wokka.
Gavin - You flatter me. There was a distinct lack of skill and patience on my part with this one - and there's plenty to nitpick if you get up close. It has been a great learning experience, and ultimately what I would call a successful prototype.
Wokka - Some day I'll have another go and really take my time with it. Ultimately the time off work and a very infrequent gig opportunity got the better of me, and I did some silly things.
Still, it's turned out better than I'd hoped given the time constraints, so I don't think I'll change too much. If I can bear to be without it for a couple of months, I'll properly clear coat it - leave it warts and all underneath, but just make sure it's going to last.
---
So here's a quick audio sample I recorded. Still getting my head around how to best mic up my amp and so forth. Very happy with the clean sound, high gain sounds a little bit too "metalzone", but I do love the bite of the attack. I might need to dial down the treble and bring up the mids.
Link
Pickups are Artist Bullbuckers - cheap Chinese made Jazz/JB knockoffs - very happy with them so far. Amplifier is a Marshall JCM2000 DSL50 clean on Channel A, driven hard on Channel B. Recorded with an ES57 (Chinese made SM57 knockoff) into a little Behringer 12 way USB mixer using Audacity.
 Posting Permissions

 Reply With Quote