
You can't see it, but I am standing and applauding sir.


You can't see it, but I am standing and applauding sir.
FrankenLab:
Turning tone wood into expensive sawdust since 2016!

thats starting to get a lovely gloss axemurderer. Great work. I agree with 2 out of the 3 things drinking beer and rubbing the guitar but MacDonalds for dinner ?
I've never used aussie oil but would think minimum 48 hours curing to be on the safe side.
Current Builds and status
scratch end grain pine tele - first clear coat on !
JBA-4 - assembled - final tweaks
Telemonster double scale tele - finish tobacco burst on body and sand neck
Completed builds
scratch oak.rose gum Jazzmaster - assembled needs setup
MK-2 Mosrite - assembled - play in
Ash tele with Baritone neck - neck pup wiring tweaks and play in

Wow, that burst is just phenomenal.

SO with Xmas and all it has been a while between updates. I have been making progress though.
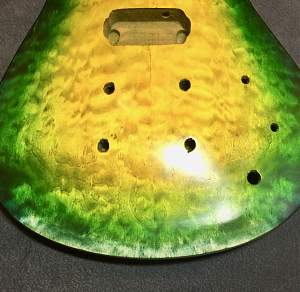
As predicted by Simon and others, the holes on the headstock became very close to the edge once I'd got to the shape I wanted. I plugged the top two with dowel and re-drilled.
The old holes are covered by the quilted maple veneer on the front and I'm reasonably sure the back of the tuners will cover the rear.
I applied the same colours to the headstock as the body but they did come out a little darker due to different wood.
Cheers
Dean
Next up was to fix some application marks on the dye. I'd left some stripes on my last burst of blue.
Mask, sand and re-apply.
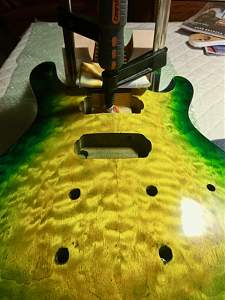
Now onto one of those "no turning back" moments - glueing the neck. The neck was a good tight fit on the sides. I did have to level the bottom of the neck pocket with a touch of sand paper. I got enough glue squeezing out to indicate that I'd applied just enough and not too much.
Onwards to the arm muscle building part of oil and cut and polish and wax.
I applied about a dozen coats of the Aussie Oil. About halfway I did a wet sand with 1200 and a 0000 steel wool two coats from the end. Then a cut and polish by hand with Maquires. Finally a coat of U-Beaut Traditional Wax and a good rub. I'll likely do another wax coat and buff with the mop after getting all the gear in.
It is difficult to get the quilt effect in photos as you see in the mags and big brand guitar websites. Any tips would be appreciated.
I'm quite happy with the shine and depth of the finish but I have learned a lot about the underlying prep as I've gone along.
Next up is shielding and wiring. Stay tuned (tuned - get it:-)
Cheers
Dean

Very very nice indeed

Looking fantastic, beautiful depth in the quilt.
Scott.
that's looking unreal Axemurderer. top work indeed. Love the colours in the burst and the headstock matches nicely
Current Builds and status
scratch end grain pine tele - first clear coat on !
JBA-4 - assembled - final tweaks
Telemonster double scale tele - finish tobacco burst on body and sand neck
Completed builds
scratch oak.rose gum Jazzmaster - assembled needs setup
MK-2 Mosrite - assembled - play in
Ash tele with Baritone neck - neck pup wiring tweaks and play in
 Posting Permissions

 Reply With Quote