
Nice one Dedman, looking forward to see how this turns out. Either G/B or R/B, I think they both look great.
rob


Nice one Dedman, looking forward to see how this turns out. Either G/B or R/B, I think they both look great.
rob

Love this kit Dedman, Really like that green ! Both are cool though...think I might have to get one too

+1 on the dark green/Black burst, I really would like to see what that would turn out like given the Dedman treatment.Originally Posted by wokkaboy

FrankenLab:
Turning tone wood into expensive sawdust since 2016!

so.. all the bits are here. Nearly time to start.
PUP is the neck one from the set I bought for the Jnr and only used the bridge. I will have to glue a couple of strips of ply under the top for the mounting screws as they miss the edges by about 1/2 mm, the P90 being wider.
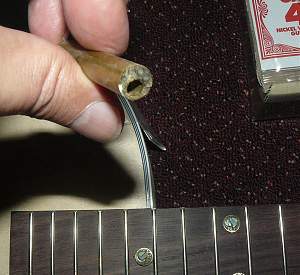
Tail piece is a gold Kluson one as are the tuners which have the matching grooves. I have gold strap buttons and jack socket and a brass nut to finish it all off. wtf are those things on th efret board? well, I'm going to try to make some cool dots. The brass tube is used in knife making and comes in different patterns and diameters, I've sliced into into strips and will fit abalone dots into the large hole (used for a lanyard cord on knives). I'm going to finish smoothing them etc before even thinking about drilling the old dots out.
Colour will be a green/black burst. I have green fountain pen ink (thanks for link Waza) for the green, have tested it on various scraps and a couple of undiluted coats should get the bottle green I'm after. Not sure yet as to what black to use as I don't want this guitar to be glassy smooth and glossy and am thinking of using naughty oil.
Build 19 PSH-1 Kustom
Build 18 HB-4S Kustom
Build 17 WL-1 Kustom
Build 16 TL-1TB Kustom
Build 15 PBG-2-
Build 14 FTD-1
Build 13 RD-1 Kustom
Build 12 DM-1S
Build 11 MKA-2 -
Build 10 Basic strat
Build 9 JM Kustom
Build 8 FV-1G
Build 7 ES-2V
Build 6- Community prototype
Build 5 LP-1LQ
Build 4 ES-5V
Build 3 JR-1
Build 2 GD-1
Build 1 TLA-1

Another stunner in the making and I really like the fretboard dot marker idea
Sent from my iPad using Tapatalk
Current Projects
#Planning 5 String Bass

Cheers Dedman, happy to help with the fountain pen ink idea. For the black you could almost do the same or go cheap and go to officeworks or similar to buy a black ink pad refill bottle cause black is black after all. Only issue is that ink tends to bleed across the timber and along the grain lines so trying to get a defined edge may prove tricky.
Yea, thats why I'm thinking of doing some tests with paints as I intend to spray the burst. Need to figure which paints will work under T/O and get a full black
Build 19 PSH-1 Kustom
Build 18 HB-4S Kustom
Build 17 WL-1 Kustom
Build 16 TL-1TB Kustom
Build 15 PBG-2-
Build 14 FTD-1
Build 13 RD-1 Kustom
Build 12 DM-1S
Build 11 MKA-2 -
Build 10 Basic strat
Build 9 JM Kustom
Build 8 FV-1G
Build 7 ES-2V
Build 6- Community prototype
Build 5 LP-1LQ
Build 4 ES-5V
Build 3 JR-1
Build 2 GD-1
Build 1 TLA-1

those dot markers will look unreal Dedman, nice touch. Looks like some tasty upgrades
Current Builds and status
scratch end grain pine tele - first clear coat on !
JBA-4 - assembled - final tweaks
Telemonster double scale tele - finish tobacco burst on body and sand neck
Completed builds
scratch oak.rose gum Jazzmaster - assembled needs setup
MK-2 Mosrite - assembled - play in
Ash tele with Baritone neck - neck pup wiring tweaks and play in
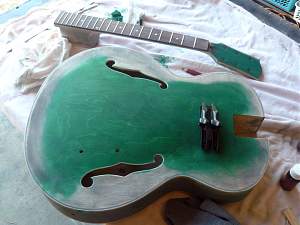
Did the timbermate slurry yesterday, first coat of ink for the burst on today.a couple of small bits of glue/filler showed up, I was able to use a fine sharpy to do a series of dots, then smudge them which pretty much hides them as part of the grain.
The clamps are holding a sliver of ply I've glued in to catch the mini humbucker mount as they just missed the edge of the hole by 1mm either side. Holes for the tail piece are drilled. Not sure about the head stock logo, might do the same as on the Jnr.
Not sure about the brass dots either, might just put in some abalone ones
Build 19 PSH-1 Kustom
Build 18 HB-4S Kustom
Build 17 WL-1 Kustom
Build 16 TL-1TB Kustom
Build 15 PBG-2-
Build 14 FTD-1
Build 13 RD-1 Kustom
Build 12 DM-1S
Build 11 MKA-2 -
Build 10 Basic strat
Build 9 JM Kustom
Build 8 FV-1G
Build 7 ES-2V
Build 6- Community prototype
Build 5 LP-1LQ
Build 4 ES-5V
Build 3 JR-1
Build 2 GD-1
Build 1 TLA-1
love the emerald green colour Dedman, I think abalone dot markers would suit best, although brass may work well too !
We better get onto Ads to see how progress if his ES-5V build is going !
So are you staining the burst edges black ?
Last edited by wokkaboy; 19-07-2016 at 08:33 AM.
Current Builds and status
scratch end grain pine tele - first clear coat on !
JBA-4 - assembled - final tweaks
Telemonster double scale tele - finish tobacco burst on body and sand neck
Completed builds
scratch oak.rose gum Jazzmaster - assembled needs setup
MK-2 Mosrite - assembled - play in
Ash tele with Baritone neck - neck pup wiring tweaks and play in
 Posting Permissions

 Reply With Quote