Page 4 of 29 FirstFirst ... 2 3 4 5 6 14 ... LastLast
Results 31 to 40 of 281

Thread: ST-1 By nitroburner1000

  1. #31
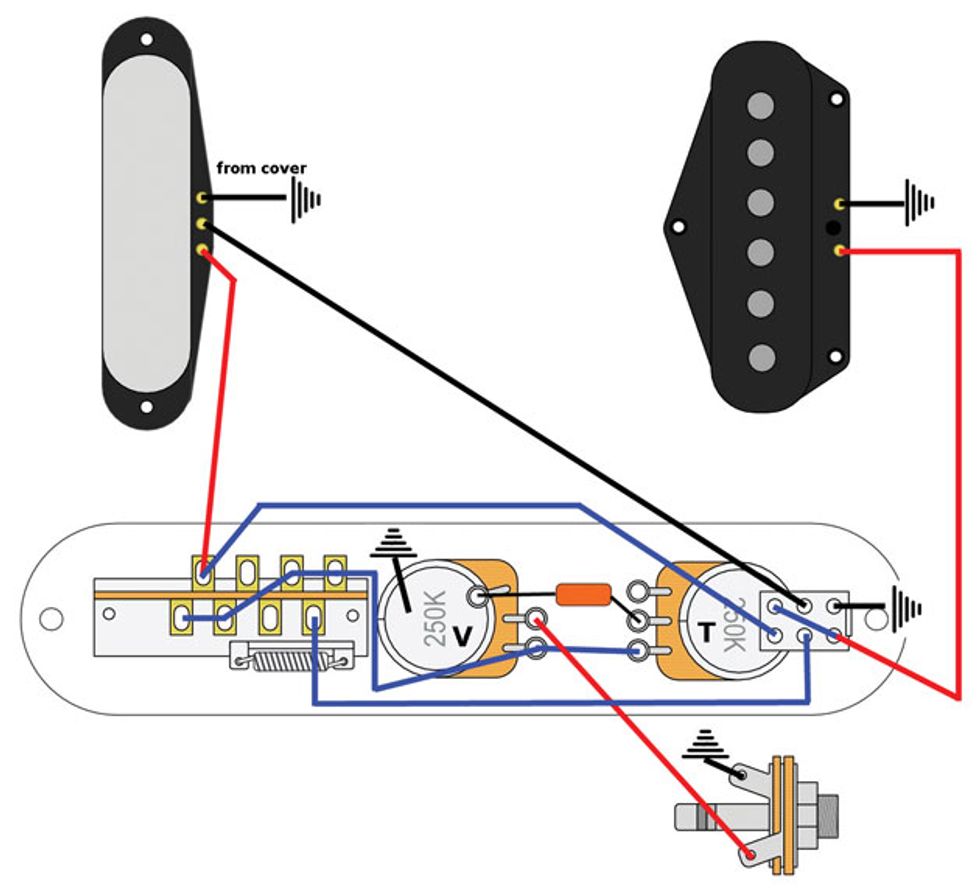
    I don't have a layout drawn up that matches your particular configuration, but the way the tone push/pull is wired in the diagram below is how you do it. Basically, you can be in any position on the 3-way and immediately switch to both pups in series (it essentially bypasses the lever switch), and switch back just with the push/pull. This is from a Premier Guitar article (with a nice diagram):


    If you wire your coil split like the SD diagram, your bridge phase swap like your last sub-diagram and then wire the bridge and neck pups' connections to the 3-way and series/parallel push/pull like above, then it should all work.

    If you're not sure let me know and I'll rough out a complete diagram for you.
    Scott.

  2. #32
    Mentor nitroburner1000's Avatar
    Join Date
    Jun 2016
    Location
    Mount Gambier Australia
    Posts
    1,171
    Quote Originally Posted by WeirdBits View Post
    I don't have a layout drawn up that matches your particular configuration, but the way the tone push/pull is wired in the diagram below is how you do it. Basically, you can be in any position on the 3-way and immediately switch to both pups in series (it essentially bypasses the lever switch), and switch back just with the push/pull. This is from a Premier Guitar article (with a nice diagram):


    If you wire your coil split like the SD diagram, your bridge phase swap like your last sub-diagram and then wire the bridge and neck pups' connections to the 3-way and series/parallel push/pull like above, then it should all work.

    If you're not sure let me know and I'll rough out a complete diagram for you.
    But if i bypass the switch wont that defeat the purpose of having the bridge in series, both pups in series and then the neck in series on its own?

  3. #33
    The 'bypass' style series push/pull connects the two pickups together in series, that is bridge -> neck -> out, whenever the push/pull is 'up' regardless of the 3-way's position. When 'down' you get the standard bridge, bridge + neck (parallel), neck on the 3-way.

    If you're talking about wanting to switch each pickup's coils between series (the standard humbucker setting) and parallel then that is something else entirely, and a different configuration to the one you originally posted.
    Scott.

  4. #34
    Mentor nitroburner1000's Avatar
    Join Date
    Jun 2016
    Location
    Mount Gambier Australia
    Posts
    1,171
    Quote Originally Posted by WeirdBits View Post
    The 'bypass' style series push/pull connects the two pickups together in series, that is bridge -> neck -> out, whenever the push/pull is 'up' regardless of the 3-way's position. When 'down' you get the standard bridge, bridge + neck (parallel), neck on the 3-way.

    If you're talking about wanting to switch each pickup's coils between series (the standard humbucker setting) and parallel then that is something else entirely, and a different configuration to the one you originally posted.
    Ok, am really appreciating your help, i usually just copy the schematics and rely on the person who drew them. So to reiterate,
    1)on the Seymour Duncan scheme i posted, the tone series /parallel pot doesnt switch the neck and bridge humbuckers from series to parallel separately, just both together?
    2) or does the master blade 3 way switch have an effect on the series/parallel push pull when it is engaged in parallel mode? (up)
    3)So the advantage of bypassing the switch would be power going directly from the humbuckers straight to the jack output, a clean more raw sound?

    Sorry to be a pain but this is my first wiring job on a guitar. This is a huge learning curve for me...

  5. #35
    Mentor nitroburner1000's Avatar
    Join Date
    Jun 2016
    Location
    Mount Gambier Australia
    Posts
    1,171
    Quote Originally Posted by WeirdBits View Post
    I could be wrong, but in that wiring diagram it looks like the bridge tone phase push/pull is missing a ground connection on the bottom left to top right diagonal link. Without it the bridge negative (in/out phase) will never be connected to ground.

    Also, the hot connections to the tone pots should be on the right side lugs instead of the left ones, as the way the diagram has it the tones will be at max on 10 instead of 0. There is also another way you can wire the neck tone series/parallel push/pull so that it bypasses the 3-way setting and instantly gives you bridge and neck in series from any position, if that's an option you'd prefer.
    Hi, ive been doing some research on the whole volume lug connections and have found something. can i have your advice. this is an excerpt from a wiring mag.....

    Click image for larger version. 

Name:	2011-02-16-Push-Pull-Pots-005-volume-cut_thumb.jpg 
Views:	483 
Size:	28.2 KB 
ID:	12139

    We’ll only need one of the switch circuits here (so a SPDT switch would suffice, but they don’t make SPDT push/pulls as far as I know). Wire the pickup signal to switch lug C, and then wire switch lug B up to the center of the volume pot (lug Y). The other two volume pot lugs are the usual arrangement- one side (lug Z) to ground, and the other side (lug X) over to the tone pot or output jack.

    NOTE: connecting the pickup signal to the center lug gives you independent volume wiring which is useful for 3-pickup guitars with a 3-way selector, or for 2-pickup guitars where you want to avoid interaction between the 2 volume controls. The downside is significant treble-loss when turning down the volume pot. You can instead wire the pickup signal B to the side lug X, and the output to the center lug Y. This will give you non-independent volume controls, which will eliminate treble loss when turning down- perfect for guitars with a single master volume and typical on 2-pickup Les Paul style guitars. Note that on a two-pickup guitars with a 3-way selector in the middle position- turning down one volume all the way will also kill the other (hence the term non-independent).

    So according to this guy input for a one volume pot is lug x and output is lug y, z goes to ground.
    Last edited by nitroburner1000; 22-06-2016 at 03:04 PM.

  6. #36
    Ok, we need to get a common frame of reference...

    There are two different ways that series/parallel are used:
    1. The way humbucker coils are connected within a pickup, series (standard) or parallel.
    2. The way two or more pickups are combined together, parallel (standard) or series.

    The SD diagram you originally posted is for the latter, combining the bridge and neck pickups together in series (linking them in series when the tone series push/pull is 'up' and in parallel when 'down'). The 'bypass' style series push/pull option I suggested is also in that format, combining the two pickups in series.

    If you want the first option, that is switching each humbucker's coils from series to parallel, then you need one push/pull for each pickup as it requires both poles of a DPDT push/pull to switch each pickup. If that's what you actually want to do then we need a very different diagram.

    Regarding linked (non-independent) vs independent volumes, yes output on the middle lug for linked volume (LP style) and ouput on outer lug for independent volumes (jazz bass style). However, the pot shown in your diagram is wired backwards for a right-handed A or B taper, as turning it clockwise to max would actually give you min volume instead of max (the ground and out should be swapped). If, on the other hand, it's a left-handed reverse taper C pot, then yes it's correct for counter-clockwise max volume. If the above was being used as a 'blend' pot to add a 3rd pup to a two pickup setup, then that's something else again.

    You're just using a single master volume pot so (with the x, y, z from above) you have ground on x, out on y, and pickup/switch/in on z.
    Scott.

  7. #37
    Mentor nitroburner1000's Avatar
    Join Date
    Jun 2016
    Location
    Mount Gambier Australia
    Posts
    1,171
    Quote Originally Posted by WeirdBits View Post
    Ok, we need to get a common frame of reference...

    There are two different ways that series/parallel are used:
    1. The way humbucker coils are connected within a pickup, series (standard) or parallel.
    2. The way two or more pickups are combined together, parallel (standard) or series.

    The SD diagram you originally posted is for the latter, combining the bridge and neck pickups together in series (linking them in series when the tone series push/pull is 'up' and in parallel when 'down'). The 'bypass' style series push/pull option I suggested is also in that format, combining the two pickups in series.

    If you want the first option, that is switching each humbucker's coils from series to parallel, then you need one push/pull for each pickup as it requires both poles of a DPDT push/pull to switch each pickup. If that's what you actually want to do then we need a very different diagram.

    Regarding linked (non-independent) vs independent volumes, yes output on the middle lug for linked volume (LP style) and ouput on outer lug for independent volumes (jazz bass style). However, the pot shown in your diagram is wired backwards for a right-handed A or B taper, as turning it clockwise to max would actually give you min volume instead of max (the ground and out should be swapped). If, on the other hand, it's a left-handed reverse taper C pot, then yes it's correct for counter-clockwise max volume. If the above was being used as a 'blend' pot to add a 3rd pup to a two pickup setup, then that's something else again.

    You're just using a single master volume pot so (with the x, y, z from above) you have ground on x, out on y, and pickup/switch/in on z.
    Wow, you make a lot of sense. Ok, i will just use the seymour duncan diagram, add a ground to the series/parallel pot and reverse the hot. Thanks heaps for your help and knowledge, your a life saver...

  8. #38
    Mentor nitroburner1000's Avatar
    Join Date
    Jun 2016
    Location
    Mount Gambier Australia
    Posts
    1,171
    Ok back to making this guitar.
    been designing the headstock shape and from about 5 designs i made up ive picked one that i think will go with the fender strat pickguard shape. I want to make everything match.

    i wanted to buy a drum sander but couldnt find one in town, tried to make a small one but it was not steady enough, so i used a coping saw to roughly cut out the headstock shape, then i bought some files and a small drill attachment and used lots of sandpaper.

    TOOLS I USED
    Click image for larger version. 

Name:	IMAG2550 (Medium).jpg 
Views:	466 
Size:	307.0 KB 
ID:	12217

    FINISHED PRODUCT

    Click image for larger version. 

Name:	IMAG2548 (Medium).jpg 
Views:	484 
Size:	210.7 KB 
ID:	12218Click image for larger version. 

Name:	IMAG2549 (Medium).jpg 
Views:	491 
Size:	220.9 KB 
ID:	12219

    Just finished putting on the primer coats. I used a primer, sealer undercoat, this stuff is soo strong it sticks to glass, its also an awesome grain filler.
    It dries in about 10 mins, enough to build up 2 or 3 coats. Will leave it for a few days to make sure it dries, then sand and 2 more coats. This sealer sands up really smooth and dries dead flat. You can put oil or acrilic paint over the top.

    Click image for larger version. 

Name:	IMAG2553 (Medium).jpg 
Views:	480 
Size:	140.7 KB 
ID:	12220Click image for larger version. 

Name:	IMAG2554 (Medium).jpg 
Views:	494 
Size:	202.5 KB 
ID:	12221
    Last edited by nitroburner1000; 25-06-2016 at 04:09 PM.

  9. #39
    GAStronomist wokkaboy's Avatar
    Join Date
    Dec 2012
    Location
    Perth WA
    Posts
    13,555
    looking good Nitro love the headstock shape is pretty original
    Current Builds and status
    scratch end grain pine tele - first clear coat on !
    JBA-4 - assembled - final tweaks
    Telemonster double scale tele - finish tobacco burst on body and sand neck

    Completed builds
    scratch oak.rose gum Jazzmaster - assembled needs setup
    MK-2 Mosrite - assembled - play in
    Ash tele with Baritone neck - neck pup wiring tweaks and play in

  10. #40
    Mentor nitroburner1000's Avatar
    Join Date
    Jun 2016
    Location
    Mount Gambier Australia
    Posts
    1,171
    Quote Originally Posted by wokkaboy View Post
    looking good Nitro love the headstock shape is pretty original
    Thanks Wokkaboy, the comments you guys leave really mean a lot to me.

Page 4 of 29 FirstFirst ... 2 3 4 5 6 14 ... LastLast

Posting Permissions

  • You may not post new threads
  • You may not post replies
  • You may not post attachments
  • You may not edit your posts
  •