
I thought we'd agreed not to talk about Pest's drinking problem. He was underage at the time.


I thought we'd agreed not to talk about Pest's drinking problem. He was underage at the time.
Current:
GTH-1
Completed:
AST-1FB
First Act ME276 (resurrected curb-side find)
ES-5V
Scratchie lapsteel
Custom ST-1 12 String
JBA-4
TL-1TB
Scratch Lapsteel
Meinl DIY Cajon
Cigar Box lap steel
Wishing:
Baritone
Open D/Standard Double 6 twin neck

haha classic Fretty, Pest is still underage for about another 7.5 weeks !
Doc you hit retirement number of pages - 65 !
Current Builds and status
scratch end grain pine tele - first clear coat on !
JBA-4 - assembled - final tweaks
Telemonster double scale tele - finish tobacco burst on body and sand neck
Completed builds
scratch oak.rose gum Jazzmaster - assembled needs setup
MK-2 Mosrite - assembled - play in
Ash tele with Baritone neck - neck pup wiring tweaks and play in

Originally Posted by wokkaboy

Hahahaha.....good one Wokka, nah, I'm not drinking the final coat...honest...lol.
I'm guessing that I'll have to go into retirement then, that was a really short career as a guitar builder, wasn't it?.....j/k
On another note, I now have only another 35 pages to go to get to 100.
Last edited by DrNomis_44; 05-04-2016 at 06:13 PM.
Okay, so I've checked the finish on the Strat Body after leaving it hanging up to dry,it does seem to be touch-dry but I'm going to give it more time before I go and apply another coat.
I'm just having my regular caffeine fix at the moment and will then get to it and get the Soldering mini-tutorial done, stay tuned.
Last edited by DrNomis_44; 05-04-2016 at 07:12 PM.

Still reckon there is a cracker of a reality TV show with Shazza and Doc's epic build diaries....
There is always a workaround for glitches, mistakes and other Guitar building gremlins.....
In my honest opinion, I think Shazza rules, she really got that 50's Rockabilly vibe nailed with her build, I might consider having a go at building the same kit she got for one of my later kit builds, one of my mates has a guitar that looks similar and it has a Bigsby on it, really nice guitar to play, it has a floating wooden bridge on it though, he got it custom made for him, I might see if I can take a pic of it next time I'm at his place so I can post it for everyone to check out.
Okay, I've had my regular caffeine fix so I'd better get my backside into gear.
Mini Soldering Tutorial
Thought I would include a mini-tutorial on Soldering in my STA-1M build diary for anyone who may be interested in improving their soldering skills, now if any of you are already good at soldering, feel perfectly free to humor me, this is mostly for all the newbies at guitar building, I'm going to show you how I was taught to solder while I was doing a Basic Electronics Course through TAFE at the Charles Darwin University here in Darwin in the mid 90's, I also want to add that I have been pursuing Electronics as a hobby since I was 13 years old, I'm now currently 46 years old....my goodness, time certainly flies doesn't it?
Anyway, when you go to do a soldered electrical-connection, there are at least two phases involved, preparation, and then the actual soldering.
Preparation:
When you go to do the preparation prior to soldering, you want to make sure that the two pieces of metal to be soldered are clean, this helps the hot molten solder to stick to, and flow onto the two surfaces to be soldered together, if the solder doesn't stick, or "take" to the surface of the metals this creates what is called a Dry Solder-Joint, this is bad because a Dry Solder-Joint creates a high-resistance electrical connection which can cause bad earthing problems, or can stop circuits from functioning normally like they're supposed to, or, loss of audio signals.
After the surfaces to be soldered are cleaned, there are a further four phases to the preparation prior to the actual soldering, they are:
1, Cut.......Cutting a piece of plastic-insulated wire to length, remembering that it is easier to shorten a wire than to lengthen it, so maybe cut it a bit longer than it needs to be.
2, Strip......Strip a short length of plastic insulation off the end of the wire, for a piece of wire that's going to be soldered to a solder-lug on a pot you can strip off about 4 to 5mm of the insulation, which should be enough.
3, Twist......Some pieces of wire will contain lots of small strands of copper-wire bundled together inside the plastic insulation, what you want to do prior to soldering is to twist the strands together to form a single neat strand, try and twist the wires all together in the same direction.
4, Tin.....To "Tin" the single bundle of twisted copper-strands means to coat the bundle with Solder, this is done to ensure a good solder-joint that is Electrically strong.
I will be posting some pics shortly to illustrate each of the four phases more clearly.
Okay here are some pics to illustrate the four soldering-preparation phases:
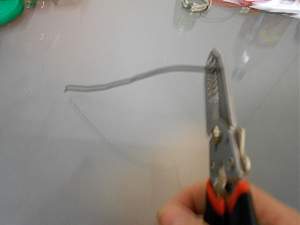
Cut:
I used my wire stripping-tool to cut the piece of wire to the required length.
Strip:
I then used my wire-stripping tool to strip about 5mm of plastic insulation off the end of the wire, making sure I didn't completely remove it, then I used the excess insulation to neatly twist the small copper strands together to form one single strand.
Twist:
You can see in the pic how the twisted copper-strands have twisted together neatly, this is what it should look like with no fraying, it should look like a single strand of copper wire.
Finally we come to the Tin-phase:
When you go to tin the wire, first wipe the tip of the soldering-iron on the damp cleaning-sponge, or a damp cotton rag after applying some solder to the tip, this tins the soldering iron tip so it can heat the joint to be soldered more efficiently, when you actually go to tin the wire, use the tip of the soldering iron to heat the copper strands and then apply the solder to both the soldering iron tip and the copper strands, don't apply the solder to the iron tip and use it to transfer the solder to the copper strand because the flux in the solder will have gone up in smoke and won't be able to do it's job.
The job of the flux inside the standard 60/40 Electronic Solder is to boil-off any dirt, grease, and oxidation contaminating the surfaces of the metals to be soldered, if the Flux goes up in smoke before it can do it's job, this could potentially create a dry solder-joint.
Last edited by DrNomis_44; 05-04-2016 at 09:32 PM.

Doc, I reckon you ought to post this in the "How to thread" more people will find it.
Build 19 PSH-1 Kustom
Build 18 HB-4S Kustom
Build 17 WL-1 Kustom
Build 16 TL-1TB Kustom
Build 15 PBG-2-
Build 14 FTD-1
Build 13 RD-1 Kustom
Build 12 DM-1S
Build 11 MKA-2 -
Build 10 Basic strat
Build 9 JM Kustom
Build 8 FV-1G
Build 7 ES-2V
Build 6- Community prototype
Build 5 LP-1LQ
Build 4 ES-5V
Build 3 JR-1
Build 2 GD-1
Build 1 TLA-1
Good point and a good idea, or maybe one of the mods could copy the data and paste it to a thread in the How To section.
Actually, what I'll do is see if I can duplicate it in the How To section.
Last edited by DrNomis_44; 05-04-2016 at 09:28 PM.
 Posting Permissions

 Reply With Quote
