Page 5 of 8 FirstFirst ... 3 4 5 6 7 ... LastLast
Results 41 to 50 of 77

Thread: Gr-1sf

  1. #41
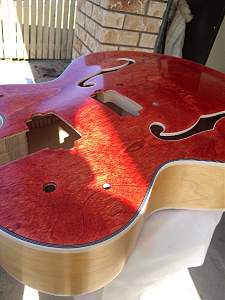
    Well hello everyone,as you all provably noticed I haven't been here now for a while, well I didn't stop the progress on my GR-S1, I did get stuck and deep into several problems specially right after the final coat, it would never dry, always kinda sticky, very rough finish and could never get the shine I was after.. Painful.. it sure was, had to sand it down several times thinking the next time would work.. wrong (sorry folks but the truth can hurt), any how... after so many attempts, I finally realized that if it drys, I would not get the shine I'm after, and when it didn't , yep you guessed it, sand down as much as possible and back to square one, either way..
    Only this time and with much research to be on the safe side, I only used the Dingo tone Stain, made sure it was dry, (after 4 weeks) sand down with 800 wet and dry and sprayed with acrylic clear.. and all heavens opened a new chapter to my project.. I now going to post some of the pics to share with you all,I've applied 8 coats of clear, 2 spray, 3 day sand down with 1200 wet and dry, repeated the steps and today I only used medium to heavy ( on the tin says the number 2 and I guess it would be the grade of the cutting compound)cut and polish and to me is mission accomplish!!
    When I hold it right next to me is like looking into a mirror, here might not be able to see as much but I must admit, I finally got to where I wanted, so next is the next..Click image for larger version. 
Name:	Shing Back3.jpg 
Views:	233 
Size:	105.3 KB 
ID:	7297Click image for larger version. 

Name:	Shing Back3.jpg 
Views:	233 
Size:	105.3 KB 
ID:	7297Click image for larger version. 

Name:	Shining Back2.jpg 
Views:	240 
Size:	132.4 KB 
ID:	7298Click image for larger version. 

Name:	Shining Back 1.jpg 
Views:	224 
Size:	136.5 KB 
ID:	7299Click image for larger version. 

Name:	Shining top1.jpg 
Views:	231 
Size:	161.1 KB 
ID:	7300Click image for larger version. 

Name:	Shining top2.jpg 
Views:	240 
Size:	133.1 KB 
ID:	7301

  2. #42
    I meant to say next is the neck.. and will post more picks in the coming days.. till then,hope you all had a wonderful Christmas,and wishing all a prosperous, safe and healthy new year..

  3. #43
    Overlord of Music Andy40's Avatar
    Join Date
    Oct 2015
    Posts
    3,913
    Oh I like the effect of the grain under that shine...looks good.
    Build #1 - ST-1 - Completed
    Build #2 - LP-1SS - Completed
    Build #3 - TLA-1R - Completed
    Build #4 - SGD-612 - Completed
    Build #5 - ES-1G - Completed
    Build #6 - STA-1HT | Completed
    Build #7 - ST1JR - Completed
    Current Build #8 - JBA-4
    Build #9 - Semi-scratch build Tele x 2 - Completed
    Current Build #10 - PRS-1H
    Current Build #11 - AGJR-1 - Completed
    Current Build #12 - ATL-1SB
    Current Build #13 - GST-1
    Current Build #14 - FBM-1

  4. #44
    Wow! Nice work mate! I think next time I'll follow your lead

    Sent from my GT-I9195 using Tapatalk

  5. #45
    Thanks Andy, was a hard one but learnt a lot from it, it looks a lot nicer and feels real good when you holding it, the after effect is really good..

  6. #46
    Thanks S/F, looks really good I'm very happy now with the end result, I just hope it will sound as good as it now looks too lol...
    And yeah if you do trust me it will amaze you how good it looks, when you do post some pics too, soon I finish this one I will get another of the same and try more like orange close to the original Grestch...

  7. #47
    GAStronomist wokkaboy's Avatar
    Join Date
    Dec 2012
    Location
    Perth WA
    Posts
    13,555
    wow that looks excellent Caesar, nice and shiny ! Well done re-doing the finish till you were happy. The end result is very nice. Worth persisting ! The natural sides look cool against the red top
    Current Builds and status
    scratch end grain pine tele - first clear coat on !
    JBA-4 - assembled - final tweaks
    Telemonster double scale tele - finish tobacco burst on body and sand neck

    Completed builds
    scratch oak.rose gum Jazzmaster - assembled needs setup
    MK-2 Mosrite - assembled - play in
    Ash tele with Baritone neck - neck pup wiring tweaks and play in

  8. #48
    Quote Originally Posted by Caesar View Post
    Hello SB, have you done the neck and hardware??
    Yeah mate. All done. Turned out to be very playable straight off the workbench. I put some videos up of it playing on the forum somewhere :/

    Sent from my GT-I9195 using Tapatalk

  9. #49
    Member sansan's Avatar
    Join Date
    Dec 2015
    Location
    madrid/SP
    Posts
    99
    Quote Originally Posted by Caesar View Post
    I must admit, I finally got to where I wanted, so next is the next.
    jeje, i love this, because its the final goal to every hobbie project...the struggle to find what we want trough the time, effort, hard work, ilussion, desesperation, satisfaction and the seeking for more...

    You finally acomplished and its a beauty! AS im reading your post, a bunch of images and nightmares revisited my head during my es335 finishing from black chinese "polyWTFlacquer??" sanding and the conversion to dyes staining with red powder (truly horror) that never never gets dry and too many others issues that becomes later....

    Good job CAesar!
    Last edited by sansan; 31-12-2015 at 03:26 PM.
    sometimes you eat the bear....and sometimes the bear eats you

  10. #50
    Member Arzi's Avatar
    Join Date
    May 2015
    Location
    Vantaa, Finland
    Posts
    400
    Stunning looking piece of work Ceasar!

Page 5 of 8 FirstFirst ... 3 4 5 6 7 ... LastLast

Posting Permissions

  • You may not post new threads
  • You may not post replies
  • You may not post attachments
  • You may not edit your posts
  •