
here it is


here it is

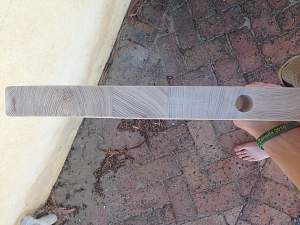
Hey Willem it's looking good after some sanding. The ash grain is very confusing as it changes direction on different pieces of the body. As for the top and bottom I generally sand top to bottom regardless of what the grain looks like.
The cutway of the lower horn I generally sand along the curve, whatever is easier for your wrist but you have grain running all different directions.
The bottom edge you can try and sand the direction of the grain but it's much easier to sand along the whole edge side to side rather than sanding the short distance across.
Everyone has different techniques but best thing to do is do some sanding and run your fingers over it and you will feel any small bumps or machine marks.
What grit you on now ?
As you are going solid paint probably not much point going finer than 320 grit
Current Builds and status
scratch end grain pine tele - first clear coat on !
JBA-4 - assembled - final tweaks
Telemonster double scale tele - finish tobacco burst on body and sand neck
Completed builds
scratch oak.rose gum Jazzmaster - assembled needs setup
MK-2 Mosrite - assembled - play in
Ash tele with Baritone neck - neck pup wiring tweaks and play in
I'm still on 220 and haven't applied timbermate yet, originally I was planning on applying timbermate at 400 and then sand that back to 1200 and then start with paint but I currently only have up to 400 and need to get paint on sooner rather than later so I might try put on the timbermate at 240 then go up to 400 before paint. Thanks for suggesting just going straight along the edges I had been getting a bit sore from constantly trying to sand in different directions
Hey Willem. I found this video real useful when I started sanding my first body.
https://www.youtube.com/watch?v=Gxf9HVScCDg
The guy points out that sanding, especially on the ends and sides, is like stroking the fur on a dog or cat and that it's best to go in the direction of the grain (or fur) rather than against it. That idea really stuck with me and made the job seem a lot easier. Of course the cat reference also fits with the notion that there's more than one way to skin a cat
The main thing is to work your way up through the grits as you already know.
Good advice from Wokks and VH with the scale length adjustments. It's probably best to measure and adjust things now before you apply the finish. I've got a similar problem with scale length etc on an ES-1 kit and have found that the holes for the bridge posts are not square to the body - the bridge would be leaning back a few degrees if I fitted it as things are now. Because of this I had trouble getting an accurate measurement from 12th fret to bridge. Scott has had a similar problem with his GR-1SF and has plugged the holes. That's probably what I'll do so I can redrill them after gluing the neck so I have the scale length spot on.
Cheers,
Dennis.

Hello Willem, front and back I go along the length of the body, cutaways follow around but I roll the paper around something round to help get into the inside curves (I currently use a round fishing knife sharpener) or piece of dowel. Outside edges and bottom I generally just follow around. However on my last ST-1 I did follow the basswood grain in whatever direction it took (esp. around the bottom edge) and the result was superb, just a few more hours of sanding required.
Current Projects
#Planning 5 String Bass

if you are going a solid colour, 400 will be fine. The primer , once sanded will be very smooth. I sand primer 400, 800, 1500 and that is plenty. Same for top colour coats. Wet sand your primer, colour and gloss.
Use enough primer for even coverage, and same with colour. It doesnt have to be thick, just get full coverage. The clear will lock it all in and then you can go finer with the sanding to get nice gloss. you can go 1500 and 2000 easily then buff. some go as high as 4000, but good buffing from 2000 should be plenty. You can always sand finer if you dont get the gloss you are after.
Stan's LP Build for my Sister: http://www.buildyourownguitar.com.au...ead.php?t=3146
Benson Pickup Strat mod: http://www.buildyourownguitar.com.au...ead.php?t=5229
Epiphone LP headstock fix: http://www.buildyourownguitar.com.au...ead.php?t=3410
Martin Backpacker Repair: http://www.buildyourownguitar.com.au...?t=5038&page=3
'57 Harmony Jazz guitar project: http://www.buildyourownguitar.com.au...ead.php?t=2972

The body will always be length-wise, but he end grains sometimes you will have to experiment. Also the body is made of multi pieces that can have different orientation of the end grain.
I find that if I am sanding the end grain and the scratches won't come out that I am sanding the wrong direction. If start sanding at 90 degrees to what I was doing before that I will get almost immediate results.
Current:
GTH-1
Completed:
AST-1FB
First Act ME276 (resurrected curb-side find)
ES-5V
Scratchie lapsteel
Custom ST-1 12 String
JBA-4
TL-1TB
Scratch Lapsteel
Meinl DIY Cajon
Cigar Box lap steel
Wishing:
Baritone
Open D/Standard Double 6 twin neck
okay so I think I've got it up to scratch with the 240 and so i have a couple questions:
Should I timbermate the neck as well?
Can I glue the neck on before painting or if I need to timbermate the neck then before doing the timbermate? also I assume I should sand the neck to as high a grade as I can get my hands on so as to get the best and smoothest finish?

Hey Willem, I reckon it depends on whether you're going to paint the neck or do it clear.
... but either way, a couple of things to be aware of - the necks are maple which is a lot more dense (about double the density) than the basswood of the bodies and the grain of maple is a lot more "closed" than basswood ... so the need to seal the grain on maple isn't nearly as critical as it is on basswood ... and to be honest, unless there's a lot of holes, dings or gouges in the neck you may not need to use Timbermate on it all.
So IMHO ...
... if your painting, just a good sand smooth and then into the primer/undercoat, etc.
... if you're doing it clear just a good sand smooth (240's fine) and straight into the clear
Last edited by Scott J.; 10-01-2015 at 04:35 PM.
Wait a minute ... that sounds like Rock and/or Roll!
SG-1 ... "Little Miss" finished in Flamenco Cherry Wudtone
TL-1A ... "Slugger" finished in Antique White Nitro
EX-1 ... "Metal God" finished in nickel-plate (work in progress)
ST-1A ... "Scrapper" stained and finished in linseed oil ... and with the "secret weapon"
GR-1SF ... "Rocker-billy" (just arrived, work in progress)
totally agree with Scott on necks vs bodies
Stan's LP Build for my Sister: http://www.buildyourownguitar.com.au...ead.php?t=3146
Benson Pickup Strat mod: http://www.buildyourownguitar.com.au...ead.php?t=5229
Epiphone LP headstock fix: http://www.buildyourownguitar.com.au...ead.php?t=3410
Martin Backpacker Repair: http://www.buildyourownguitar.com.au...?t=5038&page=3
'57 Harmony Jazz guitar project: http://www.buildyourownguitar.com.au...ead.php?t=2972
 Posting Permissions

 Reply With Quote

