
The end of the neck should sit just back from the pocket, so that you've got maybe a 0.5-1mm ledge for the front edge of the pickup ring to rest on at the sides of the neck.


The end of the neck should sit just back from the pocket, so that you've got maybe a 0.5-1mm ledge for the front edge of the pickup ring to rest on at the sides of the neck.
I've let the guitar for 2 months to cure. There were a few cr imperfections. So I just did a rework and final polish as there were a few uneven pits I had missed. Having experienced some expansion of the wood cap when I used water as a lubricant previously, this time I repolished it first with 1500 grit lubricated with Meguiars ultimate as a lubricant, then the same with 2000 grit and then switched to Meguars Carnauba before finally buffing. It seems to have worked a treat. Will fix neck this week hopefully.

Completed Builds
#7 FS-1
#6 FV-1G
#5 ATL 1SB Thinline
#4 ST1-Jnr
# 3 JBA-4
# 2 LP-1S
# 1 TLA-1R
I've let the guitar for 2 months to cure. There were a few cr imperfections. So I just did a rework and final polish as there were a few uneven pits I had missed. Having experienced some expansion of the wood cap when I used water as a lubricant previously, this time I repolished it first with 1500 grit lubricated with Meguiars ultimate as a lubricant, then the same with 2000 grit and then switched to Meguars Carnauba before finally buffing. It seems to have worked a treat. Will fix neck this week hopefully.
Completed Builds
#7 FS-1
#6 FV-1G
#5 ATL 1SB Thinline
#4 ST1-Jnr
# 3 JBA-4
# 2 LP-1S
# 1 TLA-1R
Shiny
Completed Builds
#7 FS-1
#6 FV-1G
#5 ATL 1SB Thinline
#4 ST1-Jnr
# 3 JBA-4
# 2 LP-1S
# 1 TLA-1R

Looks great DJP! Youll be looking forward to get the neck on it and get strung up yeah?
FrankenLab:
Turning tone wood into expensive sawdust since 2016!
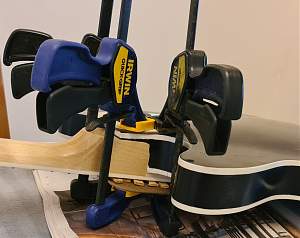
Anyone know exactly what the woodglue that came with the Pibull kit is and how longbI should leave guitar clamped ?
Last edited by DJP; 07-08-2022 at 03:07 PM.
Completed Builds
#7 FS-1
#6 FV-1G
#5 ATL 1SB Thinline
#4 ST1-Jnr
# 3 JBA-4
# 2 LP-1S
# 1 TLA-1R
Thanks. It is behaving much better than the flying V I refinished. The finish on that one cracked, and has now re-cracked months after refinishing. It looks like in the same places as far as I can tell. It is bizzare. But this time a nicer gentle "relict look" rather than major caverns. I guess sometimes you do something mixing finishes and then something happens down the line. I had hoped I had completely fixed it though.
Completed Builds
#7 FS-1
#6 FV-1G
#5 ATL 1SB Thinline
#4 ST1-Jnr
# 3 JBA-4
# 2 LP-1S
# 1 TLA-1R
I used Simons tip about cork tiles to project frets. Think it has worked.
Completed Builds
#7 FS-1
#6 FV-1G
#5 ATL 1SB Thinline
#4 ST1-Jnr
# 3 JBA-4
# 2 LP-1S
# 1 TLA-1R
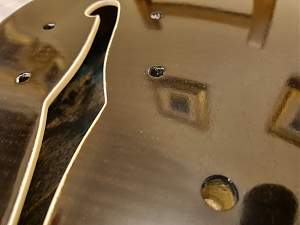
Here is the back after the refinishing. A few minor cosmetic fixes at neck joint to do before harware goes on and wiring. On the previous photo you can see where the binding was broken near the neck pocket (in kit when received). It is now firmly reattached and embedded in nitro. But the crack is visible so I will probably scrape back a little see if I can hide somehow.

Completed Builds
#7 FS-1
#6 FV-1G
#5 ATL 1SB Thinline
#4 ST1-Jnr
# 3 JBA-4
# 2 LP-1S
# 1 TLA-1R
Ive no idea what the Pitbull woodglue is. I was i initially under the impression that it was Titebond, but the original red label stuff is a creamy yellow, and the kit stuff was recently described as white.
But on their website, Titebond recommend clamping and stressed joints for 24 hours (for all their wood glues).
 Posting Permissions

 Reply With Quote