
Ha ha, good luck!
I like the spray set up


Ha ha, good luck!
I like the spray set up
#001 (LP-1S) [finished - co-runner up Nov 2018 GOTM]
#002 (WL-1)
#003 (MPL Megacaster - semi scratch build) [finished]
#004 (ST-1 JR - Arachnoid Superhero build) [finished]
#005 (LP jr)
#006 (TL-1A)
Junk shop acoustic refurbs (various)
'The TGS Special'

Don't place the body directly against anything. You really need to get it so that it's not touching the floor or sides/back of the booth. Spray will get in the places where it touches and you'll get ridge lines of paint building up there. You can get stuck in a never-ending loop of sanding and repair spraying if you're not careful.
I almost always spray the body flat, one side at a time and place it on something soft in the middle to raise it up from the table. That way, you don't get paint directly spraying the places where it's being supported. Or else hang it from a support.
You can always drill out a small hole where the rear strap button will go and fit a small eye screw (I use one with a thread that's thinner than the strap button screw so that I don't make the hole too big) if you want to hang it up. You do generally get less runs if spraying flat. However rattle cans do spray best when held upright.
Last edited by Simon Barden; 12-06-2020 at 04:44 PM.
Thankfully, I am just spraying the top. All went pretty well, colour looks good. had some spatters towards the end so I think Ill be sanding back a little and getting a new can and waiting for another day over 15 degrees.
Good advice for the next build though thankyou.

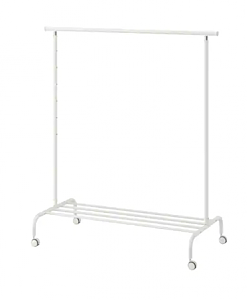
I have a large cardboard enclosure almost identical to yours, but I hang the guitar from an overhead beam into the box. That might be an option if you have something to hang from. If I didn't have a convenient beam, I would try something like this (from Ikea):
Mantra: No more pedals, must finish BlueyCaster...
Disclaimer: I haven't done woodwork since high school, and wasn't really paying attention at the time ...

You should have glued the neck in before you primed it on those hollow bodys when your painting them getting the paint off the binding can be a real pain I use a 3mm and 6mm fine line tape on them, when you remove a masking tape or scraping the binding makes a real mess. Fine line tape isn't expensive and it's a lot better for going around a bend, make sure you're using a high build primer and feather it towards the edge of the binding, if you aren't good at painting take your time and before you shoot the primer give a couple of coats of etch primer it works great as a sealerOriginally Posted by Jomasgaard

3mm fine line tape press herel
6mm fine line tape press here
Mark
Last edited by phrozin; 13-06-2020 at 11:02 AM.
My facebook
126 guitars done so far still going, 34 Starts, 25 Teles, 27 Les Pauls, 11 SGs, 8 Hollow Body, 21 Super Strats
Definitely wish I had taped off the edges first go around. The scraping on top isnt too bad though, I think Ill tale for the next coat after I sand back a little just to ensure a clean line.
The binding is already pretty stuffed on the sides due to bleed through during staining (thanks feast watson spirit stain) but thats okay.
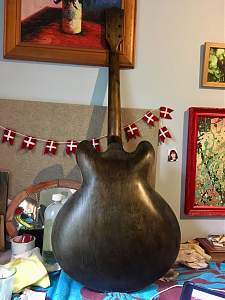
If it wasnt clear, the back and sides are staying black and wont be sprayed gold. Doing a gold top thing. Like the look currently, hopefully it comes up well on the next coat. Just needed that one more and started getting spatters everywhere.
Decided the binding was always going to shit me. So it is now gone. Didnt take photos of that process because it was so fiddly and lengthy. They sure liked the glue on this one.
All off now, minimal damage to the sides which I have since filled, but a slight bit to the top so itll be repriming and spraying the top.
Ive ordered some lengths of white-black-white and black-white purfling for the top (it had to go as it got damaged stripping off the binding. And Brown tortoiseshell binding for front and back to match the headstock. Looking forward to that fiddly process! Anyone done it before?
I ended up sanding back the neck and sides as I felt my black japan stain was a bit cold. I added some passes of light and dark oak through as well and I am much happier with the result.
First coats of oil going on the neck, back and sides today. Happy with how that bit is looking.
Havent taken many photos of the rebinding process, its mainly been a lot of glueing, fiddling about with acetone and lots and lots of sanding.
Finally getting there though.
Polishing up nicely. Ill have to restin the sides and a but if the back, but that aint no trouble. Respraying the top as well.
Would definitely recommend not trashing your binding first time around, it# nit for the faint of heart.
Top marks for having a go at re-doing it.
Okay, so second spray is done. Its okay....long way from perfect, but I think I am happy with its rustic charms.
Got an issue though. Everything is ready to glue down the neck, however the action seems crazy off. The bridge and stop tail are screwed down to the bottom of their adjustment and the string height is still very high. Im not particularly familiar with tuneomatics or set neck guitars so any advice would be very welcomed.
 Posting Permissions

 Reply With Quote