Page 15 of 20 FirstFirst ... 5 13 14 15 16 17 ... LastLast
Results 141 to 150 of 192

Thread: Rev's MK-2 Build

  1. #141

  2. #142
    Member Rev's Avatar
    Join Date
    Oct 2016
    Location
    Knoxville, USA
    Posts
    147
    I put a heavy E string on it and ran it through practice amp to make absolutely sure the entire circuit worked. Everything tested OK as far as the electrics.
    Now that Ive got neck seated properly Im just waiting for my drill to charge up.

  3. #143
    Member Rev's Avatar
    Join Date
    Oct 2016
    Location
    Knoxville, USA
    Posts
    147
    Neck bolted on. While it was sitting flat for me before, now that gap is back on the treble side. Thought the bolts would pull any slighter gapping together, but it didn't.

  4. #144
    Member Rev's Avatar
    Join Date
    Oct 2016
    Location
    Knoxville, USA
    Posts
    147
    Anyway, I did put all six on, but the nut slots def need to be deepened and the necks got a fair amount of back bow.

  5. #145
    Member Rev's Avatar
    Join Date
    Oct 2016
    Location
    Knoxville, USA
    Posts
    147
    With truss rod loosened Im closer, but I gotta deepen those nut slots for sure.

  6. #146
    GAStronomist Simon Barden's Avatar
    Join Date
    Oct 2016
    Location
    Reading, UK
    Posts
    10,547
    I'd leave it at least a day without doing anything to it with the strings tuned up to normal pitch. The neck needs to settle under tension before you do any more.

    Then the set-up should proceed in the following order:
    A) Adjust the truss rod for the correct neck bow - just very slightly concave. Do this slowly, maximum 1/4 turn at a time and wait for the neck to settle down before re-adjusting.
    B) Adjust the saddle height to set up your preferred action. To take the high nut out of the equation, it can pay to use a capo on the 1st fret when doing this.
    C) Cut the nut slots so that the strings are just above the first fret but not buzzing on it when played. You can then probably reduce the overall height of the nut as well by filing (and then polishing), as you only need the slots deep enough to cover the strings.
    D) Set up the saddle intonation.

  7. #147
    Member Rev's Avatar
    Join Date
    Oct 2016
    Location
    Knoxville, USA
    Posts
    147
    I was joking with a friend that now begins the delicate dance of nut, truss and bridge.

  8. #148
    Member Rev's Avatar
    Join Date
    Oct 2016
    Location
    Knoxville, USA
    Posts
    147
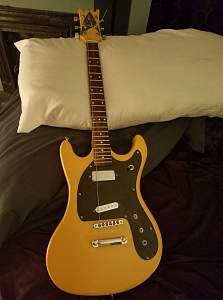
    Anyway, here it is, right before I put strings on... I didn't like the push-on knobs that came with it, but found some similar ones in my parts box that fit a little better after I took the pic.
    Click image for larger version. 

Name:	OneString Test.jpg 
Views:	315 
Size:	65.6 KB 
ID:	19435
    Last edited by Rev; 19-05-2017 at 10:35 PM.

  9. #149
    GAStronomist Simon Barden's Avatar
    Join Date
    Oct 2016
    Location
    Reading, UK
    Posts
    10,547
    I forgot it had a zero nut (D'oh!), so you can cut the slots as deep as you like as the strings need to rest on the zero fret. It's looking great.

  10. #150
    Member Rev's Avatar
    Join Date
    Oct 2016
    Location
    Knoxville, USA
    Posts
    147
    Zero fret might give me some room to work with as far as neck relief goes. What Ill need to avoid is a setup that has the bridge sitting so high that the bridge pickup cant get close to it.

Page 15 of 20 FirstFirst ... 5 13 14 15 16 17 ... LastLast

Tags for this Thread

Posting Permissions

  • You may not post new threads
  • You may not post replies
  • You may not post attachments
  • You may not edit your posts
  •