
The problem is that I can still see too much grain filler on the sides. Probably I didn't send them enough. That makes the side way darker than the rest of the body and with the red - pink colour of the grain filler...


The problem is that I can still see too much grain filler on the sides. Probably I didn't send them enough. That makes the side way darker than the rest of the body and with the red - pink colour of the grain filler...

Hi Ganna please post some photos of the sides, sounds like you didn't sand the grain filler enough if there is too much pink colour
Current Builds and status
scratch end grain pine tele - first clear coat on !
JBA-4 - assembled - final tweaks
Telemonster double scale tele - finish tobacco burst on body and sand neck
Completed builds
scratch oak.rose gum Jazzmaster - assembled needs setup
MK-2 Mosrite - assembled - play in
Ash tele with Baritone neck - neck pup wiring tweaks and play in

Yes, it sounds like the sides need more sanding to remove some more grain filler. I would use a lighter grit - 240 or even 320
This is the side of my previous TLA build, you can see how far I sanded back leaving in this case the lighter grain filler in the grain
Sent from my GT-I9506 using Tapatalk
Current Projects
#Planning 5 String Bass
Ok guys. As soon I get back home I will post some pictures. Around 6 pm. Thanks!
Just arrived at home!
I don't know if you can see it in the pictures but at the bottom of the guitar there is this pink-red area that doesn't look nice as the rest of the guitar. Should I sand it or is too complicated to apply the stain it back after?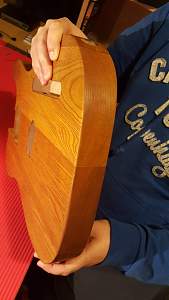
Ganna the pink doesn't look too bad. If you can live with it then keep applying coats, otherwise sand it back, it's your build so it's your decision.
Current Builds and status
scratch end grain pine tele - first clear coat on !
JBA-4 - assembled - final tweaks
Telemonster double scale tele - finish tobacco burst on body and sand neck
Completed builds
scratch oak.rose gum Jazzmaster - assembled needs setup
MK-2 Mosrite - assembled - play in
Ash tele with Baritone neck - neck pup wiring tweaks and play in
yes, probably I will keep it that way. I'll do better on the next build. Thanks!

I couldn't see what kind of stain you are using, what is it?
By the way, Hi Eddy...welcome to the forum
Build #1 - ST-1 - Completed
Build #2 - LP-1SS - Completed
Build #3 - TLA-1R - Completed
Build #4 - SGD-612 - Completed
Build #5 - ES-1G - Completed
Build #6 - STA-1HT | Completed
Build #7 - ST1JR - Completed
Current Build #8 - JBA-4
Build #9 - Semi-scratch build Tele x 2 - Completed
Current Build #10 - PRS-1H
Current Build #11 - AGJR-1 - Completed
Current Build #12 - ATL-1SB
Current Build #13 - GST-1
Current Build #14 - FBM-1
Hi Andy!
I used DT coolangatta gold.
Just a quick update, I printed my logo, name of the guitar and surname on a decal paper and put it on the headstock. It looks good!
Now I just have to put the neck finish on top and wait. How many coat do you normally apply guys? I was thinking to apply this coat and then a second one in one week. Do you use steel wool after the final coat?
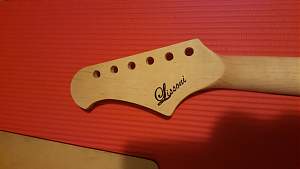

Hi Ganna, it might take a few clear top coats to cover the decals properly. Unfortunately at some angles you will most likely still see the outline of the transfer and possibly more top coats is the only way to disguise that.
 Posting Permissions

 Reply With Quote
