As you have a floating bridge, it’s so much easier to move the tailpiece that trying to re-align the neck. I’d definitely move the tailpiece.
Thanx Jim. My last project was a strip canoe, so I have a fair bit of experience with both. I know with softwood , the timber will fail before the PVA will, just wasn't sure with the tension of the strings how it would fair with the maple. PVA it is then <thmbsups>.
Yeh, I was kinda comming to that conclusion. The pocket in the hollow body is a box, not carved out of solid timber, so there isn't much you can remove for adjustment. The fingerboard sits a fair way above the body, so you *could* attack the neck, but that would still be fiddly. Potentially hours fine tuning with rasps and planes vs 5 seconds with a drill... I know my preferred option, but I wanted the opinion of someone with more experience. Thank you sir.
The other option available is to 'pin' the bridge so that it is kept in the right place for the strings, but it does mean that the strings will then run at a slight angle back to the tailpiece. Pinning the bridge is something you may want to do anyway later if you find the bridge slips around in use. Best done once you've set up the guitar and got the position right for best intonation with your choice of strings, so that you can mark the correct position with tape before fixing it.
You can also use double-sided tape rather than pinning, but I'd prefer direct bridge-to-top contact rather than put a softer layer in-between the two that could affect vibration transfer. But it is something you can easily try and then remove if you don't like it. But the tape glue could affect some kinds of finishes (though it will obviously be hidden by the bridge).
[
The height of the strings with the bridge set to it's minimum height is already about where it needs to be, so there is not much adjustability needed. The two set screws used to adjust the bridge height stick up a fair bit and could probably be used to screw the base of the bridge to the body, even though they are machine threads..if push comes to shove they could probably be epoxied in if need be. I'll see how it behaves after playing I think before doing anything drastic.
Similar colouring to what i have done on my build, i am looking forward to seeing your finished Bass
Using a couple of small small cut-down panel pins is less drastic, (knock them into the top, cut off the tops of the pins to leave a couple of mm exposed, press the bridge down to mark the positions, drill a couple of small holes and fit) and allows them to be removed and new pins fitted in a slightly different location if you ever decide to switch string gauges or types which need bigger intonation adjustments. Epoxy or CA really isn't a good idea.![]()
Yeh, I came across your thread today when I was looking to see if anyone else had issues with the strings not lining up. The Barn Red is similar to my Cherry Red. Initially I wasn't going to stain it, but spray it with red candy. I had no intention of doing another instrument after this, but then I saw the EX-4 and the wheels started turning hehe.
I think it will be a while before this is finished, I have some other parts and materials ordered..
That works. I was pondering the problem of intonation. I guess you have to adjust all the strings at once, since you can't adjust each string individually, so you are kinda relying on the contact points on the bridge have to be accurately placed at the factory..
I haven't seen a kit bridge on these basses in detail. The pictures seem to indicate you've got 4 slots across the bridge. I don't know if its at all possible to pull the saddle out from one slot and move it forwards or backwards to improve the intonation at all? You'd probably only want to do this with the A and D strings as the E and G string saddles can be moved by adjusting the overall bridge position.
Welp, the neck is glued (it will get a rest because I'm still waiting for pegs I'd ordered and some black pearlised material). I've added the hardware I could (including the infamous strap button on the back of the body). Since I'm still waiting on the material for making a new control panel, I can still wire up the controls. I do have a question for any of the electronic wizards. The wiring diagram has all earths on the same solder point, with two unused pads. Those unused pads appear to be on the same track as the solder point on the diagram. Is there any reason why I can't reduce the clutter and use those unused pads?
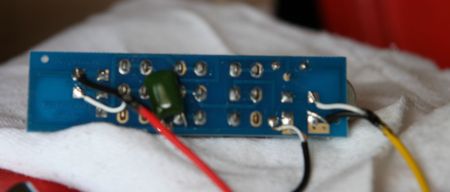
I don't know anything about the PCB in the HB-4 (assuming it is a PCB as the kit photos don't show the underside of the switch panel) but if you can test it out with a multimeter or continuity buzzer, and they are connected, then no, no reason why not. Just make sure that the path isn't reliant on a switch being in a certain position.
A photo of the PCB would help to double check the path if you haven't got a multimeter.
Whilst the PBG wiring diagram shows long lengths of the shield wire going to the common ground point, it's best if you can use either heatshrink insulation, some outer insulation wire covering or even insulation tape to cover long shield wires, to make sure that they don't accidentally touch a signal connection when installed and floating about inside the guitar, and so cause sound loss.
Last edited by Simon Barden; 07-10-2020 at 07:33 PM.