Page 1 of 3 1 2 3 LastLast
Results 1 to 10 of 22

Thread: SG-1F - For Those About To Rock

  1. #1
    My 8 year old nephew (soon to be 9) has announced that he needs an electric guitar… what can you do

    So, as he's about to start rockin' he needs an appropriate axe. It needs to be light, have a nice slim neck, be usable by someone still growing, and have attitude to match his… so it appears my SG-1F will instead be going to a better home. I promised to post a build diary, so here we go.

    It has been decided that colour will be Amaranthine with silver highlights, and chrome Gotoh hardware - keystone tuners, TOM bridge and Aluminium tailpiece (gotta keep that weight down ) For pickups, I've got a few options here already, but I think I'll try something a little different (more on that at a later date).

    The kit looks good with some nice flame on the cap, a bit of knotty grain above and below the bridge pup but not bad. And, the neck fit is tighter than a… than can be be adequately described in a 8yo-friendly thread such as this. The fretboard has some interesting colours with hints of red that should darken nicely with a touch of Dr. Ducks.

    First mock-up pics:


    Scott.

  2. #2
    Centre-lining the headstock showed that a bit of trimming would be needed to get it balanced and symmetrical (traditional shape), and with the tuners in place in the original holes you could really see the asymmetry. The tuner hole alignment wasn't bad, with only the D string hole being a little too far off for my liking. So, I decided to make a maple plug to match and re-drill it.

    Centreline, grid and outline of shape.


    Tuners in-place to eyeball it and check alignment etc. (note the difference between the pegs and the edge for the D and G tuners)


    Headstock roughly shaped and maple plug sitting in position.


    Scott.

  3. #3
    Headstock shape refined, plug glued, and tuner hole re-drilled… I know, I know, it's only a mm or so - but it would have really bugged me if I didn't correct it.


    Cleaned up and sanded down to 180 grit ready for some detail work later on.


    Scott.

  4. #4
    Body work…

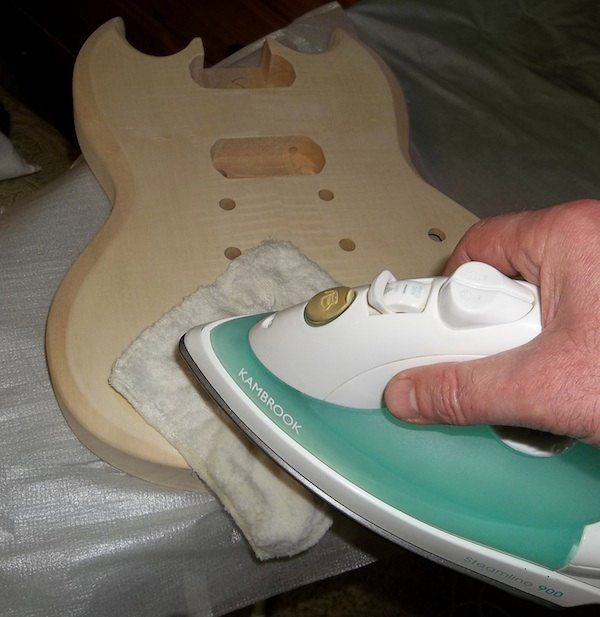
    A close inspection of the cap showed a couple of very small dents/marks that would show up once the Wudtone went on, so rather than risk sanding them out I decided to take the domestic route. I mean, irons are meant for guitar building, right?

    The dent prepped with a damp cloth.


    Ironing the troubles away… no more dents!


    (Don't worry Jett, this is perfectly normal)


    Scott.

  5. #5
    So, while testing the alignment of the hardware with the neck in place (using a fishing line centreline), I noticed the bridge pickup was pushed a bit towards the treble side. In fact, the pickup rout was cut several mm's towards the treble side. Looking more closely showed that the centreline of the cap, formed by the book-matching, wasn't aligned with the centreline of the neck. It's 8-10mm's different at the tail. Strangely it seems like the bridge pup rout is based on the cap centreline, while (fortunately) the bridge and tailpiece post holes have been drilled from the neck centreline. No real drama, just a little odd. The bridge and tailpiece are perfectly aligned and the neck pickup is pretty close, it's just the bridge pup that's a few mm's out.

    Just to confirm that I wasn't hallucinating, I lined my long steel rule up with the cap join line and you could really see the difference between it and the actual centreline.


    Bridge pickup slightly off-centre.


    Cap join offset from neck centreline.


    Angle formed by cap join (note to self: never assume the cap join is the centreline).


    Scott.

  6. #6
    As I would need to reference the actual centreline for many of the next steps, I lightly pencilled it onto the body because with the neck out I wouldn't be able to use the fishing line any more (and just seeing the line formed by the cap really messes with your eye). So, the bridge pickup needed to move 4-5mm's towards the bass side, but doing so could leave too little wood for the pickup ring screws on the treble side, and there could be a small gap under the ring (although the pickguard would hide it). Just to be safe I cut some maple blocks, glued them into position on the treble side edge of the bridge pup route, then reshaped the rout around the centreline.


    Once I was happy with the fit, I added a little filler over the maple blocks ready to be cleaned up when I start sanding the cap.


    And, here's the newly aligned pickup rout.


    Scott.

  7. #7
    Similar to my LP build, the post holes on this kit are again just a little too large for the hardware I'll be using, so to get the best fit possible I'm again plugging and re-drilling the holes. In this case, they don't have to be moved/re-aligned at all, just re-drilled for a better fit (I could just smear some glue and sawdust around the inside of the existing hole, but I prefer to re-drill them to the size and depth I want).

    Plugs shaped, sized, and cut to length.


    Plugs glued in place and tape removed, ready to be re-drilled in a day or two.


    To be continued…

    Scott.

  8. #8
    Moderator Gavin1393's Avatar
    Join Date
    Sep 2012
    Location
    Mindarie, Western Australia
    Posts
    3,152
    Always a pleasure to read your posts and see your appreciation of the fact that these are kits and we are guitar builders not just painters and assemblers!
    http://www.buildyourownguitar.com.au/forum/image.php?type=sigpic&userid=1258&dateline=1443806  448Gavmeister

  9. #9
    Mentor
    Join Date
    Aug 2013
    Location
    Mackay
    Posts
    1,276
    Great post Scott. Like Gav said, builders, not assemblers. These problems you are having and the methods you are using to fix them are the things that interest me because I can see what I need to do if it happens to me. Thanks for sharing.

  10. #10
    Member Scott J.'s Avatar
    Join Date
    Jul 2013
    Location
    Sydney, NSW
    Posts
    390
    Another great build-post Scott, and an excellent documentation of progress (love lots of pics) ... and a truly great choice of kit (a perennial favourite that I've always said is one of the great unsung heroes of Rock n Roll).

    Just one thing to be aware of with the SG (if you're not already), especially for a younger player - being such a small (and therefore light) bodied guitar, they can have quite a tendency to be "head heavy" ... admittedly not a big deal for an experienced player and something easy enough to get used (less of an effect when played standing with a strap but more noticeable when played sitting down) ... but maybe a beginner might find it uncomfortable.

    I reduced this effect on my build by doing as much reduction of the timber volume in the neck (especially towards the head) as I dared ... made for a very lovely, slim and fast neck (if you like that style - some don't) but results in not being able to put very thin gauge strings on it (thinner strings, more tension on the neck ... not good on a thin necked guitar) ... as with most things its all bit of a balancing act.

    Anyway just some thoughts considering its for a "young buck".

    Seeing some of quality builds you've knocked before, I'm really looking forward to seeing this one on GOTM!


    Wait a minute ... that sounds like Rock and/or Roll!

    SG-1 ... "Little Miss" finished in Flamenco Cherry Wudtone
    TL-1A ... "Slugger" finished in Antique White Nitro
    EX-1 ... "Metal God" finished in nickel-plate (work in progress)
    ST-1A ... "Scrapper" stained and finished in linseed oil ... and with the "secret weapon"
    GR-1SF ... "Rocker-billy" (just arrived, work in progress)

Page 1 of 3 1 2 3 LastLast

Posting Permissions

  • You may not post new threads
  • You may not post replies
  • You may not post attachments
  • You may not edit your posts
  •