Page 1 of 2 1 2 LastLast
Results 1 to 10 of 14

Thread: Simon B's 1x10" Bass Cab

  1. #1
    GAStronomist Simon Barden's Avatar
    Join Date
    Oct 2016
    Location
    Reading, UK
    Posts
    10,547

    Simon B's 1x10" Bass Cab

    I've mentioned it before a couple of times, but I haven't posted anything directly about it, but my home-made (mainly someone else's home) 1x10" bass cab is now assembled.

    I'd had a 2x10" Bill Fitzmaurice design cab for bass for a long while, but it was such a big heavy ugly thing that it stayed in the garage and never got used. Eventually I decided to break it up and I gave the two 10" Eminence speakers to my mate Jim (officially a Aussie but has been in England since he was 8 or so, so for over 50 years), who made some small PA cabs with them. In return he offered to make me a new bass cab (well, to construct it as I had to provide all the materials). So towards the start of the year, he designed and built the cab after I'd decided on a Celestion BN10-300X speaker for it.

    It was made out of Meranti-faced ply, so I started off finishing it using a dark-brown tinted varnish, followed by clear varnish over the top (both water-based from the same manufacturer). I built up several layers of each, to give me enough depth to sand flat and polish after leaving it for several weeks to cure.

    Except that when I stuck the random orbital sander on it, the varnish just peeled off in big floppy strips, it hadn't stuck to the wood at all. I was a little bit miffed.

    So I had to strip it all off and start again; which was easy except for the bottom of the cab where it had stuck very firmly. Heat guns and paint stripper didn't seem to affect it, so it was out with the heavy duty belt sander fr all the awkward patches. Which meant that I went through a lot of the outer ply layer.

    I despaired of getting it looking nice, so was wanting to just paint it one colour, but Jim though that he could re-veneer it ad took it away. Except that due to its size and wanting to use 2mm thick 'construction' veneer, he found it would be prohibitively costly to do, so we gave up on that. I then decided that I'd just do the same thing as before but with stain and different varnish and show all the battle scars as a feature.

    So started out with a black stain:

    Click image for larger version. 

Name:	Bass cab black small.jpg 
Views:	428 
Size:	413.6 KB 
ID:	27140

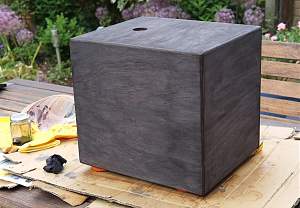
    Then sanded that back (like on a figured veneer) and then used a dark-brown stain:

    Click image for larger version. 

Name:	Cab brownstain small.jpg 
Views:	433 
Size:	423.8 KB 
ID:	27141

    I then applied yacht varnish over several weeks, giving each coat time to dry. Despite being as careful as possible, as it got varnished with the front facing down I still ended up with some runs around the front edges, so will be leaving it for quite a while before addressing those to give them time to really harden. But after five coats of varnish, I didn't see any reason not to finish putting it all together.

    So yesterday I sprayed the front face black and glued in the two plastic ports.

    Then today I started off by fitting the rear Speakon socket panel, fitted the corners and feet and top handle and spray-glued on the final bits of acoustic wadding to the inside:

    Click image for larger version. 

Name:	cab 1 small.jpg 
Views:	420 
Size:	750.2 KB 
ID:	27142

    I then soldered on the speaker leads and fitted the speaker. One slight issue was that one of the T-nuts for the speaker bolts (luckily the very first one I tried doing up) wasn't attached to the wood properly as the four triangular ears that are supposed to stick in the wood had folded over flat, so were hardly gripping the wood. When I went to tighten the bolt, the T-nit came off and just spun around. As the speaker was mainly filling the hole for it, it was a lot of hard work to get it held securely so I could remove the bolt and replace the T-nut.

    We've got a bit of a heat-wave (all relative) on over here at the moment so it was over 31°C in the shade in our garden, and I was working in the sun, so was all rather hot! Nevertheless, I got the speaker fitted:

    Click image for larger version. 

Name:	cab 2 small.jpg 
Views:	413 
Size:	545.3 KB 
ID:	27143

    Then all I had to do was attach the speaker grille (made some time ago from perforated steel sheet with the edges bent over and sprayed black) and it was all done:

    Click image for larger version. 

Name:	Cab 3 small.jpg 
Views:	415 
Size:	568.0 KB 
ID:	27144

    Continued...

  2. #2
    GAStronomist Simon Barden's Avatar
    Join Date
    Oct 2016
    Location
    Reading, UK
    Posts
    10,547
    ...continued

    Here’s the cab with its associated TC Electronics BH250 Mk 1 bass head sitting in its designated position on top of the cab. It's a fairly basic head, but is small, light and quite powerful at 250W into 4 ohms. As the speaker is a 4 ohm, 300W one, it can produce all those 250W if it's turned right up. Being a small cab, it gets rather woolly and indistinct at very loud volumes, but at least it can take it without any danger of burning out. And it’s just meant for home use.

    Click image for larger version. 

Name:	Cab 4 small.jpg 
Views:	419 
Size:	535.3 KB 
ID:	27145

    This shows the top of the cab with the handle that has been cut away to fit the feet of the amp to stop the amp (as it's very light) from being pulled off the top by either the instrument lead or the speaker lead. Or simply vibrating itself off as the cab vibrates and it can still jump about quite a bit at loud volumes but is thankfully still kept in place.

    Click image for larger version. 

Name:	Cab 5 small.jpg 
Views:	423 
Size:	607.3 KB 
ID:	27146

    There were various ideas considered for keeping the amp located, including beading around where the amp sits or insetting the area where the amp goes. But in the end, Jim's idea of cutting the corners off the handle surround, turned out to be the simplest and best solution.

    And here's the amp with a bass for a size comparison:

    Click image for larger version. 

Name:	Cab and bass small.jpg 
Views:	402 
Size:	545.2 KB 
ID:	27147

    So I'll leave it be for a month or so and then have a go at finessing the finish.

  3. #3
    Mentor blinddrew's Avatar
    Join Date
    Apr 2018
    Location
    York, Uk
    Posts
    1,122
    Thumbs up for proper handles on big bits of kit! Looking very neat, how does she sound though?

  4. #4
    Mentor Andyxlh's Avatar
    Join Date
    Nov 2016
    Location
    Sydney
    Posts
    1,206
    Ooh that's really nice. As my 4x10 is probably the heaviest thing in the house, including me and my motorbike and, well, the house too, I really like this.

  5. #5
    GAStronomist Simon Barden's Avatar
    Join Date
    Oct 2016
    Location
    Reading, UK
    Posts
    10,547
    OK. Good at quieter volumes but gets a bit more boomy/muddy as the volume increases, plus it's a bit middley to start with with everything flat. So I end up turning down the bass and the mid control and leaving the treble flat as the volume goes up. It's not short of bass end, but it's not particularly tight bass end. I find using the multi-band compressor as the Tone Print helps keep things under control, plus the bass then sustains for ever. I need to try it with Jim's new MarkBass head, to see if that sounds much different with it.

  6. #6
    Moderator fender3x's Avatar
    Join Date
    Jan 2016
    Location
    Miami, FL, USA
    Posts
    2,713
    Hmmmm a bass cab that looks like furniture. My wife might just let such a thing in the house... Nice work!

    Sent from my ONEPLUS A3000 using Tapatalk

  7. #7
    Overlord of Music dave.king1's Avatar
    Join Date
    Aug 2014
    Location
    Woonona by the sea
    Posts
    2,799
    Nice work Simon

  8. #8
    GAStronomist Simon Barden's Avatar
    Join Date
    Oct 2016
    Location
    Reading, UK
    Posts
    10,547
    I'm ending up having to turn both the bass and the mid control down quite a bit as the amp gets louder. With more volume, it gets overly bassy and indistinct and being a 1x10", is quite mid-forward anyway. When I work on the finish and take the grille off, I'll try experimenting with seeing what it sounds like with the ports filled up and stop the resonance at the port frequency.

  9. #9
    GAStronomist Simon Barden's Avatar
    Join Date
    Oct 2016
    Location
    Reading, UK
    Posts
    10,547
    Quote Originally Posted by blinddrew View Post
    Thumbs up for proper handles on big bits of kit!
    My initial thoughts were for a strap handle. But none of them were low enough to allow the amp to sit on top without touching the handle. So a recessed handle it was, even though it doesn't weigh much at all, especially with the neo speaker.

  10. #10
    Moderator fender3x's Avatar
    Join Date
    Jan 2016
    Location
    Miami, FL, USA
    Posts
    2,713
    Did you use any software to tune it? There's a plug I found at the hardware store that works great for plugging ports. I'll see if I can find a pic...

    Sent from my ONEPLUS A3000 using Tapatalk

Page 1 of 2 1 2 LastLast

Posting Permissions

  • You may not post new threads
  • You may not post replies
  • You may not post attachments
  • You may not edit your posts
  •