Page 2 of 4 FirstFirst 1 2 3 4 LastLast
Results 11 to 20 of 39

Thread: Semi-Scratch Built Long Baritone

  1. #11
    Member G-Axe's Avatar
    Join Date
    Nov 2016
    Location
    Canberra, ACT
    Posts
    413
    And as luck would have it, even more progress today. With the glue set on my humbucker template, I measured and drew centre lines and went crazy with double sided tape.

    Click image for larger version. 

Name:	20181218_114813 copy.jpg 
Views:	152 
Size:	111.2 KB 
ID:	29462

    Feeling buoyed by the success of my neck pocket, I wasted no time in attacking the humbucker routs, firstly with a Forstner bit on the drill press, and then with my template bit.

    Click image for larger version. 

Name:	20181218_115451 copy.jpg 
Views:	139 
Size:	118.2 KB 
ID:	29458

    The neck pocket turned out great... until a momentary lapse in concentration saw me chew out a chunk from the side of the neck pickup hole while lifting the router, and apparently waving it in all directions. Sucks, but it won't be visible, and won't cause any structural issues. And I've learned a valuable Christmas lesson.

    I took the bridge pickup with a bit more care, and it turned out much better. Nice clean lines, no tear-out, just a few overhanging fibres from the top ply layer that will clean up with some sanding. Anyhow, satisfied that my top routs are complete, I figured I'd shape the body with some rough cuts on the bandsaw, and I was eager to try out a new toy:

    Click image for larger version. 

Name:	20181218_123646 copy.jpg 
Views:	159 
Size:	105.6 KB 
ID:	29459

    But as it turns out, it's not the right tool for this job. All it wants to do is dig it's teeth in and try to pull my plywood monstrosity out of my hands. So I may need to rethink how I shape the arm rest, as I'd planned to use this little beast, but it seems like it might be better suited to thinner stock or softer timber. Or parmesan. We'll see. On the plus side, my 80 grit homebrew sanding drum made short work of it, and I now have a guitar body that just needs some routing for controls. And a whole lot of sanding.

    Click image for larger version. 

Name:	20181218_124722 copy.jpg 
Views:	145 
Size:	162.7 KB 
ID:	29460
    Click image for larger version. 

Name:	20181218_125132 copy.jpg 
Views:	147 
Size:	144.1 KB 
ID:	29461

  2. #12
    GAStronomist FrankenWashie's Avatar
    Join Date
    Jan 2016
    Location
    Glebe, NSW
    Posts
    5,666
    Ah me, routers. Such fun! Your cheese grater thingy might be okay on normal Timber but ply, with its cross grain construction might be a bit much fo it perhaps?
    FrankenLab
    Hand crafting guitars, because Death Rays are expensive.


  3. #13
    Overlord of Music Andy40's Avatar
    Join Date
    Oct 2015
    Posts
    3,913
    Yhep. I've done that in a neck pocket before as well!! Ahhh the lessons
    Build #1 - ST-1 - Completed
    Build #2 - LP-1SS - Completed
    Build #3 - TLA-1R - Completed
    Build #4 - SGD-612 - Completed
    Build #5 - ES-1G - Completed
    Build #6 - STA-1HT | Completed
    Build #7 - ST1JR - Completed
    Current Build #8 - JBA-4
    Build #9 - Semi-scratch build Tele x 2 - Completed
    Current Build #10 - PRS-1H
    Current Build #11 - AGJR-1 - Completed
    Current Build #12 - ATL-1SB
    Current Build #13 - GST-1
    Current Build #14 - FBM-1

  4. #14
    Member G-Axe's Avatar
    Join Date
    Nov 2016
    Location
    Canberra, ACT
    Posts
    413
    And more progress. I've shaped the headstock, and I'm pretty happy with the result. I wanted more aggressive lines than your typical 6 inline, but nothing quite as pointy as a Jackson, and somehow landed at "baby shark". Or "Flying V with a bite taken out of it"

    Click image for larger version. 

Name:	20181221_092239 copy.jpg 
Views:	127 
Size:	166.3 KB 
ID:	29492

    I'm also very excited that my aluminium sheeting arrived today, meaning I'll be able to really get stuck in over the Christmas break. My aim is to get everything cut, routed, filled, sanded, stained and oiled over the next month while I save up for some schmick German hardware.

  5. #15
    Overlord of Music Andy40's Avatar
    Join Date
    Oct 2015
    Posts
    3,913
    Oh a lost it at baby shark.
    Build #1 - ST-1 - Completed
    Build #2 - LP-1SS - Completed
    Build #3 - TLA-1R - Completed
    Build #4 - SGD-612 - Completed
    Build #5 - ES-1G - Completed
    Build #6 - STA-1HT | Completed
    Build #7 - ST1JR - Completed
    Current Build #8 - JBA-4
    Build #9 - Semi-scratch build Tele x 2 - Completed
    Current Build #10 - PRS-1H
    Current Build #11 - AGJR-1 - Completed
    Current Build #12 - ATL-1SB
    Current Build #13 - GST-1
    Current Build #14 - FBM-1

  6. #16
    Member G-Axe's Avatar
    Join Date
    Nov 2016
    Location
    Canberra, ACT
    Posts
    413
    Well that holiday break seemed to go by incredibly fast. I managed to get some good progress in, though possibly not quite as much as I'd hoped.

    The first job I did was to try out my slot cutter router bit. Each of the aluminium wings will slide into a couple of slots in the central ply body, so I've got a 3.2mm slotting bit that can cut a 12.7mm deep slot. It was actually really nice to work with, if a little intimidating given that it's basically a tiny little circular saw on a stick. It makes me want to cut some grooves.

    But the main event is getting stuck into my aluminium sheet. I've never worked with metal before, and don't really have the tools for it - which is obviously why I decided to make it an integral part of this build. I've learned so much.

    The plan was to rough out the shapes in my 3mm aluminium with a saw, and then template rout. My first instinct was to have a go at cutting sheet on the bandsaw. But then I second guessed myself, and figured I'd go out and get a fine toothed carbide jigsaw blade instead since precision was not key at this point. Here's the back of my aluminium sheet (the front has a protective film) and my "scratchproofed" jigsaw.

    Click image for larger version. 

Name:	20181227_134255.jpg 
Views:	123 
Size:	87.1 KB 
ID:	29593

    Turns out, that was a mongrel of a way to work with it. Aluminium filings immediately bounced in and under the gaffer tape, and cutting was somehow more difficult than it would have been with a hacksaw. But it did get the job done.

    My first "wing" was a proof of concept, so as soon as it was rough cut, I stuck one of my MDF templates onto it and very carefully routed around the edges. This was probably the most stressful part of my build thus far, and a clear indicator I need to invest in a router table so I don't have to try and keep a router level on a skinny, flexible bit of MDF. The edges are still a bit rough, but nothing that a bit of sanding won't fix. You'll have to forgive the smudges and double-sided tape residue, but it gives an indication of what the matt black finish will look like:

    Click image for larger version. 

Name:	20181228_121509.jpg 
Views:	145 
Size:	142.3 KB 
ID:	29594

    Feeling like there might be an easier way, I took one of my offcuts over to the bandsaw. Lo and behold, it cuts like butter. It's going to signifcantly shorten the life of my band (and probably the whole unit, given the metal filings) but what the hell? I managed to knock out my next three wings much more quickly - the bandsaw gives me a much finer and more controlled cut, with less excess to rout, and within the space of a morning, I've got this:

    Click image for larger version. 

Name:	20181230_101509.jpg 
Views:	123 
Size:	163.4 KB 
ID:	29595

    And a big heap of aluminium shavings to clean up. While I'm making an ungodly mess, I cut my "body veneers" and rout pickup holes in one of them:

    Click image for larger version. 

Name:	20190101_161535.jpg 
Views:	151 
Size:	217.7 KB 
ID:	29596

    I'm feeling like my next build should be a bit more eco-friendly, or maybe I just fork out for laser cutting.

    My last act as a man of leisure is to laminate some more super ply and cut out my "sandwich fillings" that will sit between the wings.

    Click image for larger version. 

Name:	20190101_162826.jpg 
Views:	131 
Size:	178.3 KB 
ID:	29597

    For now, just roughed out on the bandsaw, which thankfully still cuts, and awaiting some fine shaping on a sanding drum. The plan is to get the wing sandwiches assembled and sand them as a whole, so everything is completely flush. Speaking of flush, I also need to make a return trip to the green shed to pick up a bottom bearing flush trim bit so I can rout the aluminium top plate to be perfectly flush with the neck pocket.

    I'm pretty happy to have gotten most of the tricky stuff out of the way (control cavity and arm rest are still pending) and over the next few weeks I'll start playing around with some wood fill and stains while I wait for my fancy furniture bolts to arrive from China.

  7. #17
    Member G-Axe's Avatar
    Join Date
    Nov 2016
    Location
    Canberra, ACT
    Posts
    413
    The last little while has been all about experimentation. My first experiment was to get some Feast Watson Mahogany Prooftint. My first instinct was Jarrah, but after look at colour swatches online and in the green shed, Mahogany seemed closer to my vision. What could go wrong? It's not like it would weirdly turn purple, right?

    Click image for larger version. 

Name:	20190104_193046.jpg 
Views:	119 
Size:	162.2 KB 
ID:	29622

    So that was weird. Really not sure what's gone awry with this, but I'm reminded of my school days, when someone thought planting a mulberry tree at a school where the kids all wear white shirts was a good idea. Doubly disappointing, the 4x7mm ply blocks I created don't have much of a stripe to them.

    But not to worry, I still have a bit of my original centre block left, just enough to recut my odd shapes - but with a bit of extra work to get them from 48mm down to 28mm using my poor man's thicknesser - a bandsaw. I'm pretty happy with the results, but didn't have my phone around to capture it.

    Anyway, after another trip to the green shed, I've grabbed a tin of Jarrah stain, and a little bottle of black. I'm very keen to highlight the striping in the ply, and I feel like getting some black into the end grain, sanding back a bit and then staining in jarrah will give me what I want:

    Click image for larger version. 

Name:	20190106_141224.jpg 
Views:	128 
Size:	122.1 KB 
ID:	29623

    I'm much happier with the colours (black + jarrah top, just jarrah sides) and I'm really happy with how the black is accentuating not only the end grains but also the other grains, pores, scratches, etc. It's going to be really interesting to see how it looks on a curve, with the direction of the end grain changing.

    But back to waiting on my furniture screws. I feel like maybe I should give that deck an oil too.

  8. #18
    Member G-Axe's Avatar
    Join Date
    Nov 2016
    Location
    Canberra, ACT
    Posts
    413
    More progress. I'm expecting to go through a lot of sandpaper during this bit, so here's my "hot swap" sanding drum:

    Before:


    After:


    Over the course of the night, I went through two of them, but I now have the bottom wing all shaped. I'll hit the wooden bits with a few finer grits and then it's ready for a stain.

    Also, all of my Chinese furniture bolts have arrived, so I can get it bolted on to the body core. Exciting times ahead!


    Sent from my SM-G955F using Tapatalk
    __________________________

    #4 - Zero Budget
    #3 - Semi-Scratch Baritone w. PBG 30" Tele neck
    #2 - EX-1
    #1 - ST-1M

  9. #19
    Member G-Axe's Avatar
    Join Date
    Nov 2016
    Location
    Canberra, ACT
    Posts
    413
    The lower wing is now bolted on. It will come off again for finishing, but pretty happy with how it all hangs together. I've also laminated some more ply for the arm rest, and flush trimmed the aluminium face and back.


    I've also ordered the rest of the hardware from Banzai in Germany. And of course a bunch of neck oiling.

    Sent from my SM-G955F using Tapatalk
    __________________________

    #4 - Zero Budget
    #3 - Semi-Scratch Baritone w. PBG 30" Tele neck
    #2 - EX-1
    #1 - ST-1M

  10. #20
    Overlord of Music Fretworn's Avatar
    Join Date
    May 2013
    Location
    Hornsby Area, Sydney, NSW
    Posts
    3,951
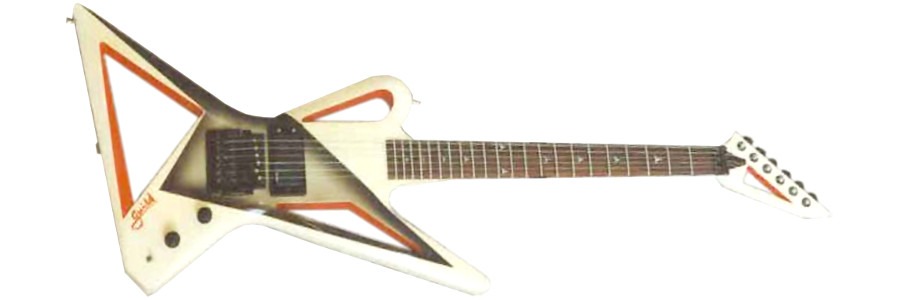
    I know it looks nothing like it, but each time I see this I think of the old Guild Bladerunner....
    Current:
    GTH-1

    Completed:
    AST-1FB
    First Act ME276 (resurrected curb-side find)
    ES-5V
    Scratchie lapsteel
    Custom ST-1 12 String
    JBA-4
    TL-1TB
    Scratch Lapsteel
    Meinl DIY Cajon
    Cigar Box lap steel

    Wishing:
    Baritone
    Open D/Standard Double 6 twin neck

Page 2 of 4 FirstFirst 1 2 3 4 LastLast

Posting Permissions

  • You may not post new threads
  • You may not post replies
  • You may not post attachments
  • You may not edit your posts
  •