Page 1 of 8 1 2 3 ... LastLast
Results 1 to 10 of 74

Thread: First Build: Red and Black Wilko Johnson Telecaster

  1. #1

    First Build: Red and Black Wilko Johnson Telecaster

    Hey Guys,

    Really, really impressed with some of the builds I’m seeing you put together!

    I’m booked in to do a week-long classical guitar building course in the summer, and thought I’d warm up by putting an electric kit together (a telecaster—a red and black one like Wilko Johnson’s, for those of you who are as old as me).

    Two quick questions:

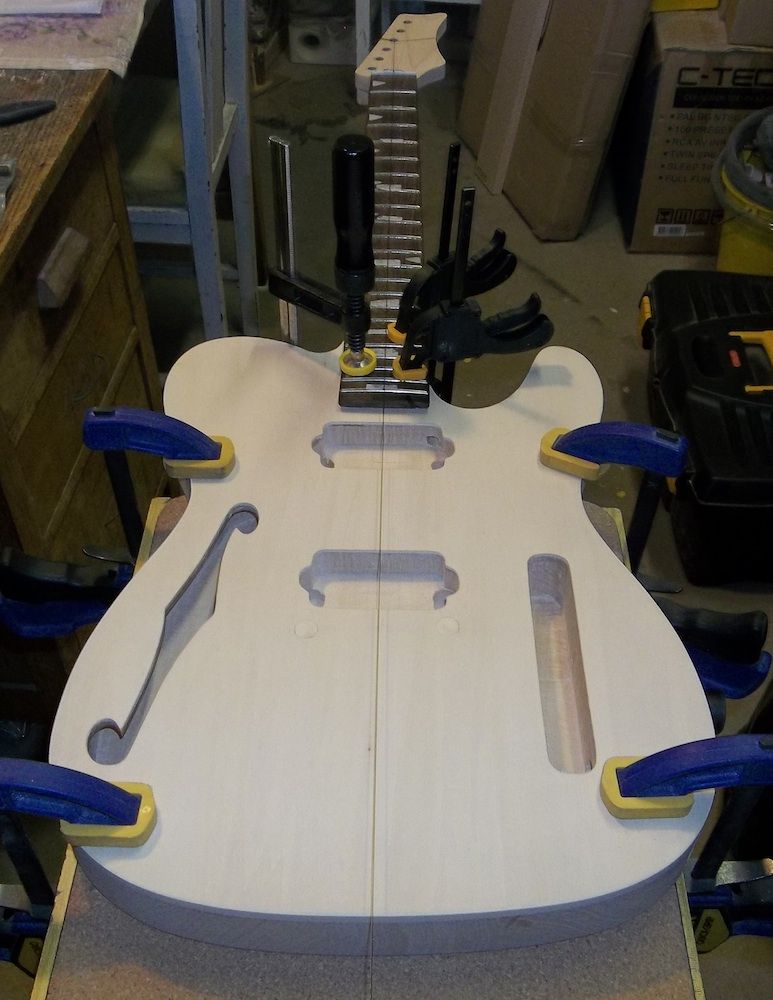
    1) For positioning the bridge, how do you find the centerline? Do you split the difference down the attached neck and carry on a pencil line through the body?

    2) Sanding.

    On the Pitbull website it says to start sanding with 120 or 180 grit, and don’t go past 220 grit so there’s still some tooth for the stain.

    However, as an experiment, straight out the box I just stroked the body with 2,000 grit (yes, that fine) and already it feels like a newborn’s posterior. If Pitbull says, “sand, sand, and then sand again” what am I missing, because it already feels perfect..?

    Thanks and best,

    Mark

  2. Liked by: Tony

  3. #2
    Overlord of Music dave.king1's Avatar
    Join Date
    Aug 2014
    Location
    Woonona by the sea
    Posts
    2,721
    You don't need a glassy finish on the wood because of the difficulties of getting the finish to bind, a little bit of barely perceptable roughness provides the key for the stain / paint, sealer / undercoat.

    For my builds I have bolted the neck up, taken a centreline and marked it out from there, I do use low tack masking tape ( the blue stuff ) for marking out so I don't finish up having to get these lines off the timber.

    Remember when you set the scale length that the route for the bridge pickup is often not quite in the right place and may require some adjustment, the E1 string is the shortest from nut to bridge and the E6 ( the fat one ) the longest and you need adjustment for intonation across all the strings so bear this in mind before cutting and drilling.

    For the bridge pickup route, get the bridge place without the PU in place and once that's taken care of check the the PU fits the cavity without bind

    Good luck with the build and ask questions as they arise, lots of clever people on here who are more than happy to help

  4. #3
    GAStronomist FrankenWashie's Avatar
    Join Date
    Jan 2016
    Location
    Glebe, NSW
    Posts
    5,666
    Hi Mark and welcome!

    If you are going to stain, then you need to be sure that you haven't gone past 220-240 grit else the stain simply won't soak in. If you are going to paint, then you might be okay at 2000, but you'd probably going to want to go back over it with 600-800, agian just to give the undercoat something to hang on to.

    The Sand, sand, sand mantra is due to some of the machine sanding marks present in the factory bodies. If you wipe the body down with Gum Turpentine it will show up the machine sanding scratches as well as any glue spots that will need to be dealt with.
    FrankenLab
    Hand crafting guitars, because Death Rays are expensive.


  5. #4
    Overlord of Music
    Join Date
    Aug 2012
    Location
    Brisvegas
    Posts
    3,356
    Even paint needs something to grab on to. If you sand that fine and then paint, it will just peel off eventually.

    Like FW said, the reason for starting on a low grit and working your way up is to remove scratches and marks you might not even see until you hit it with stain and then it's a much bigger job to rectify.
    'As long as there's, you know, sex and drugs, I can do without the rock and roll.'

  6. #5
    "For my builds I have bolted the neck up, taken a centreline and marked it out from there...."

    I hear you Dave, but how exactly do you take a centerline? Do you measure across the neck at the first fret, divide by two, then make a mark. Then do the same thing at various frets down the board, finally joining up the dots and dropping the pencil mark like a plumbline onto the body where you then use it to fix the center of the bridge...?

    THank you,

    Mark

  7. #6
    "you need to be sure that you haven't gone past 220-240 grit"

    Understood FW. I suppose I'm just surprised by how good the sanded finish is already, straight out of the box.

    Gum turpentine eh? Never heard of it. Thanks for the tip, I'll pick some up tomorrow.

    Mark

  8. #7
    Overlord of Music WeirdBits's Avatar
    Join Date
    Jan 2013
    Posts
    2,731
    Yes, measure across the fretboard at various points and mark the centre (on some masking tape on the fret). The fretboard dots can wander a bit from the true centre, so measuring at several points should give you a good average. With the neck clamped in place I then run some fishing line along the neck's centre and continue it down onto the body. This also helps to align the neck's centre with body routs etc.

    Something like this:
    Last edited by WeirdBits; 22-01-2018 at 02:14 PM.
    Scott.

  9. #8
    Dr Feelgood fan eh? You have very good taste! Just at the mockup stage of a build here so I'm all eyes and ears, so much great info on here

  10. #9
    GAStronomist FrankenWashie's Avatar
    Join Date
    Jan 2016
    Location
    Glebe, NSW
    Posts
    5,666
    Quote Originally Posted by Mark Gill View Post
    "you need to be sure that you haven't gone past 220-240 grit"

    Understood FW. I suppose I'm just surprised by how good the sanded finish is already, straight out of the box.

    Gum turpentine eh? Never heard of it. Thanks for the tip, I'll pick some up tomorrow.

    Mark
    Gum turpentine is recommended over mineral turps as it is less nasty. It still pongs though. Your local big green shed should have it.
    FrankenLab
    Hand crafting guitars, because Death Rays are expensive.


  11. #10
    Overlord of Music dave.king1's Avatar
    Join Date
    Aug 2014
    Location
    Woonona by the sea
    Posts
    2,721
    Weirdy has answered in pretty clear fashion so I'll leave it there

Page 1 of 8 1 2 3 ... LastLast

Posting Permissions

  • You may not post new threads
  • You may not post replies
  • You may not post attachments
  • You may not edit your posts
  •