
stan:
What should I be looking for from the neck?


stan:
What should I be looking for from the neck?

You want to be looking for a reasonably tight fit and that when in the pocket, the centreline of the neck is aiming for a point halfway between the two stop tail stud holes. Or you can run a long steel ruler down the side of each neck to see if the continuation of the neck line ends up an equal distance from the two stop tail holes. If there's a significant list to one side, then you will probably need to work on the neck fit a bit so that it is straight. I'd use the stop tailpiece holes as the bridge holes are offset, so the tailpiece holes are more reliable.
There are normally no problems with the neck fitment, but it's worth checking, as any remedial work need to be done before any sanding and staining/waxing/painting.
You'd also want to check that the bottom of the neck heel is sitting flat against the bottom of the pocket, and not angled with a visible gap at one end. This is normally caused by one of the pocket sides not being as straight as it should be, and can normally be cured by a bit of sanding.

thanks Simon, could not have put it better
Stan's LP Build for my Sister: http://www.buildyourownguitar.com.au...ead.php?t=3146
Benson Pickup Strat mod: http://www.buildyourownguitar.com.au...ead.php?t=5229
Epiphone LP headstock fix: http://www.buildyourownguitar.com.au...ead.php?t=3410
Martin Backpacker Repair: http://www.buildyourownguitar.com.au...?t=5038&page=3
'57 Harmony Jazz guitar project: http://www.buildyourownguitar.com.au...ead.php?t=2972

Welcome to the forum cazaron. Nice looking kit - pay special attention to the glue spots (I've learned the hard way...) and can recommended goof-off to help deal with any cheers
Sent from my Moto G4 Plus using Tapatalk
Current Projects
#Planning 5 String Bass
Imgur gallery updated, and after those pictures, sanding commenced.
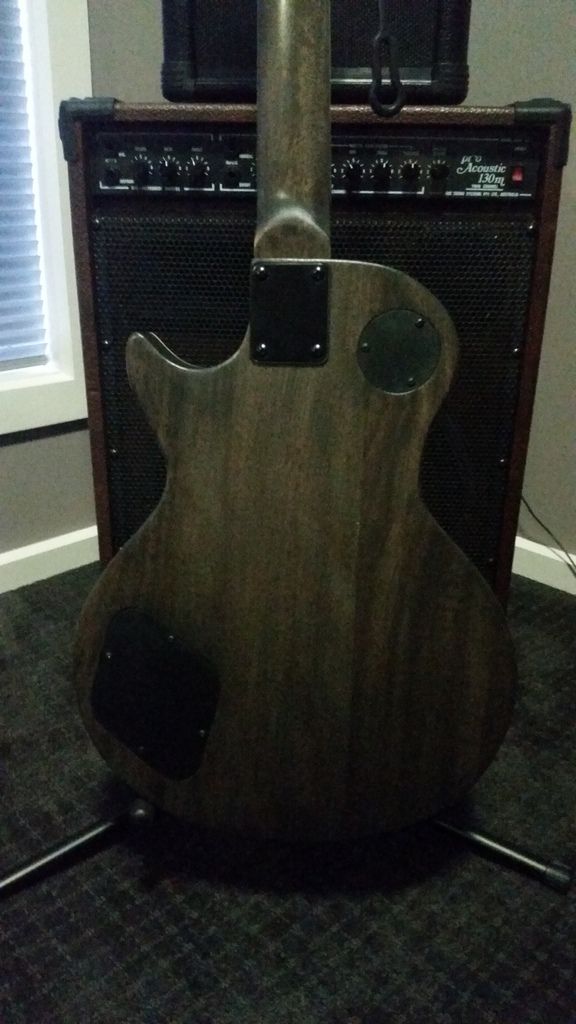
The neck appears to fit well in the pocket and it is not loose and doesn't seem too far off center if at all. It's hard to tell without reference.
The guitar is nice and smoooooth after sand 1.
Question:
I know the mantra is 'sand more' but ballpark in terms of 'how long should I be looking at', what's the sort of time range on sanding, cause all the videos seem to do it for like ten minutes, go through five grits and go 'nice'.
Cheers!
Neck fit looks OK to me. Once you glue and clamp it, any small gaps should disappear. If you measure halfway across on the first and last frets, then mark that point on those frets with a Sharpie or other thin marker pen (it will come off when you polish the frets, but avoid marking the fingerboard) , then you can run a steel rule between those points as a centreline.
The idea of sanding is not so much to get the body feeling smooth (though you will do that), as to ensure that the flat surfaces are flat and that there are no small dimples in the wood. The flatter and smoother the body is now, the better the finish will be and the less time you'll need to sand the finish flat (with a greater risk of sanding through the finish). Always sand with the grain, though a slight 5° angle to it is reportedly the best way to sand (according to StewMac).

Hey Carazon as every kit has different level of machine marks on it, out of the box you can't put a time on the sanding. With the veneer only sand it lightly with about 320 grit. Rest of the body back and sides if there are no deep machine marks start 180 and through to about 320/360 grit. The sides often need more attention with the end grain. Sand with the grain. After each grit have a good look at the body under good light and look for any machine marks and you will get a feel when you are ready to move onto a finer grit. If the finer grit isn't getting rid of machine marks move back to a lower grit till it disappears. Also run your fingers over the body is usually a good way to feel if it's smooth or has any machine marks/pits or bumps.
On average if sanding by hand you should be spending at least 2-3 hours sanding the body and at least 1.5 hours on the neck.
Last edited by wokkaboy; 05-04-2017 at 07:28 PM.
Current Builds and status
scratch end grain pine tele - first clear coat on !
JBA-4 - assembled - final tweaks
Telemonster double scale tele - finish tobacco burst on body and sand neck
Completed builds
scratch oak.rose gum Jazzmaster - assembled needs setup
MK-2 Mosrite - assembled - play in
Ash tele with Baritone neck - neck pup wiring tweaks and play in
Ay! Weekend finally hits and now that work's a whole two days away I can get back to the guitar!
http://imgur.com/a/JdbkZ once again for the gallery
First stain's down, some glue spots I missed or didn't do a good enough job of removing, no big deal, they don't look too bad and once this dries I'll give them a bit of a go over again with goo off and a brush.
But I'm happy that there's a start on this and that it looks nice so far. The pictures give it slightly more of a green look than it is actually right now, it's slightly more blue, but it does look nice and it's obviously got at least two more steps.
I'm starting to think about the neck and back/sides now, and all y'all who have already done builds, advice would be great.
- Mahogany or Ebony grain filler? I presume Mahogany keeps it all sort of consistent colour while Ebony would make the grain pop.
- Stain it after the grain filler? Something dark brown or black would look good on this I think. Any recommendations for a stain to pick up?
Cheers!

Looking good! That Tarkine Green looks really nice on that top!
I used ebony coloured Timbermate on my LP, then used a black interior stain over the top.
Acoustics:
1995 Maton EM725C - Solid 'A' Spruce Top, QLD Walnut B&S, AP5 Pickup
2015 Ibanez AEL108MD-NT - Laminated Spruce top, Laminated Mahogany B&S, Fishman Sonicore Pickup
Electrics:
Pitbull LP-1S - http://www.buildyourownguitar.com.au...ead.php?t=5745
Carsen Superstrat Rebuild - http://www.buildyourownguitar.com.au...ead.php?t=6284
Builds in Progress:
Silent Guitar Semi-Scratch Build - http://www.buildyourownguitar.com.au...ead.php?t=6809
That looks awesome. What stain did you use?
Last edited by cazaron; 08-04-2017 at 08:58 AM.
 Posting Permissions

 Reply With Quote

