Results 1 to 10 of 10

Thread: Finding Center for mounting FS-1 Trapese

  1. #1
    Member iodine74's Avatar
    Join Date
    May 2018
    Location
    Jacksonville, FL
    Posts
    10

    Finding Center for mounting FS-1 Trapese

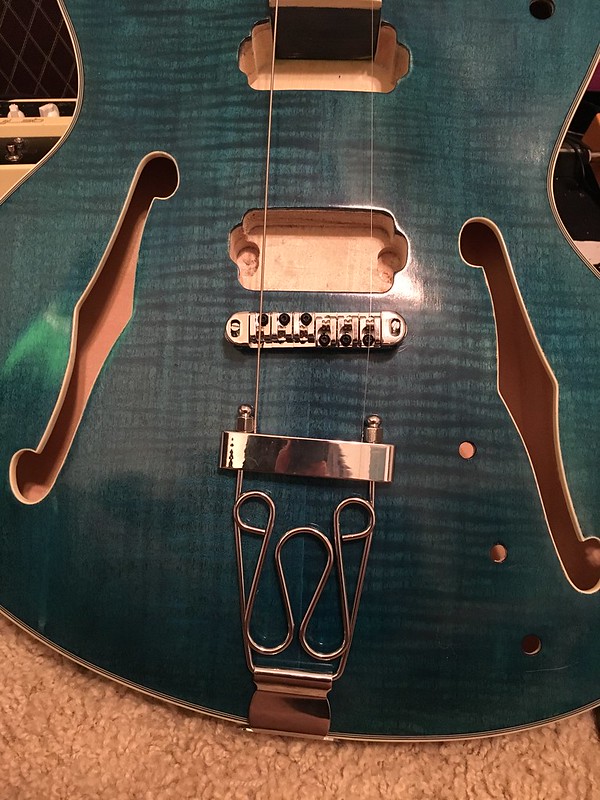
    I'm giving in and going ahead and putting the trapeze tailpeice on my FS-1. I got the bridge worked out that I had questions about previously (got a wilkinson rollerbridge and got it on today without too much trouble -- did have to enlarge the holes slightly).

    Anyways... now that the bridge is on.. time to put the tailpiece. But I've noticed that the two pieces of veneer do not meet at the same point that the two pieces of wood that I can see on the butt.

    Thinking I should center on the joint I see on the butt?

  2. #2
    Overlord of Music Fretworn's Avatar
    Join Date
    May 2013
    Location
    Hornsby Area, Sydney, NSW
    Posts
    3,951
    Have you glued the neck on yet? Rather than taking either joins as the centre you need to find the centreline of the guitar via the neck and bridge. From memory some other who have made these kits have had to bend the foot of the tailpiece so that it goes on straight.
    Current:
    GTH-1

    Completed:
    AST-1FB
    First Act ME276 (resurrected curb-side find)
    ES-5V
    Scratchie lapsteel
    Custom ST-1 12 String
    JBA-4
    TL-1TB
    Scratch Lapsteel
    Meinl DIY Cajon
    Cigar Box lap steel

    Wishing:
    Baritone
    Open D/Standard Double 6 twin neck

  3. #3
    Overlord of Music Dedman's Avatar
    Join Date
    Mar 2016
    Location
    The "Fabulous" Gold Coast
    Posts
    3,566
    Measure at various points along the width of the body and mark it ( on a strip of tape stuck to the top of the guitar) then draw line, do the same on the back, join the 2 together on the edge and there is the centre. Don't stress too much about the bracket fitting perfectly flush,I use little rubber washers ( like the ones that come with the strap button) they usually even it out if it's only a mil or so.
    Build 19 PSH-1 Kustom
    Build 18 HB-4S Kustom
    Build 17 WL-1 Kustom
    Build 16 TL-1TB Kustom
    Build 15 PBG-2-
    Build 14 FTD-1
    Build 13 RD-1 Kustom
    Build 12 DM-1S
    Build 11 MKA-2 -
    Build 10 Basic strat
    Build 9 JM Kustom
    Build 8 FV-1G
    Build 7 ES-2V
    Build 6- Community prototype
    Build 5 LP-1LQ
    Build 4 ES-5V
    Build 3 JR-1
    Build 2 GD-1
    Build 1 TLA-1

  4. #4
    GAStronomist Simon Barden's Avatar
    Join Date
    Oct 2016
    Location
    Reading, UK
    Posts
    10,547
    It may be easiest to use the string method. Clamp the neck in place (if its not already glued on), roughly fit the two E tuners, then run some thin string from the two outer slots of the trapeze over the bridge to the tuners. It should then be easy to get everything lined up and you can then mark the position for the trapeze fixing holes.

    I believe that the tailpiece doesn't come with a hole drilled for a strap button. Probably best to drill it before it's on the guitar, ideally with a stand-mounted or pillar drill so that it doesn't slip on the shiny slightly-curved surface. Use a center-punch to make a starting point for the drill. You can then drill the pilot hole for the strap button screw with the trapeze in place.

  5. #5
    Member iodine74's Avatar
    Join Date
    May 2018
    Location
    Jacksonville, FL
    Posts
    10
    So the plate for the tailpiece does have a hole drilled in it Simon, at least I don't have to worry about that.

    What I'm wrestling with a bit is getting the strings past the bridge to still be relatively straight - where they are held by the trapeze is slightly less wide than the bridge.

    The plate that holds the strings is in effect, adjustable with the two post nuts (not sure what their real name is)... but i'm not sure if it's supposed to be. But effectively I can use it to change the entire angle of the tailpiece... which since the body is angled is obviously a plus.

    But there's also a little bit of a challenge in getting it so the height of the trapeze off the body is consistent.

    I can't remember if in these pics (i took them last night).. if I've got those post nuts at full tightness or not.


  6. #6
    Mentor blinddrew's Avatar
    Join Date
    Apr 2018
    Location
    York, Uk
    Posts
    1,122
    Looks like that tailpiece needs to go round to the right about 5mm or so. The low E looks straight across the bridge but the high E swings in at the bridge. How does it look with the tailpiece lined up with the top veneer join?

  7. #7
    Following on from the sage advice already given, and it appears the neck has been glued in, another way to check the centreline for the tailpiece is to put a straight edge/steel rule along each side of the neck, mark where that lines up on the end of the body (on low tack tape) also by the end if the neck heel and between the pups or by the bridge, will need to move the bridge and posts out of the way, then measure midway between these outer marks and that should give you the centreline for the tailpiece.

    Ideally, the string retainer bar part of the tailpiece would be at right angle/ perpendicular to the centreline same as a stop bar tailpiece, which means you will need to make a tapered spacer for the tailpiece bracket where it will screw into the body. By my guesstimate that spacer will be around 5 to 6mm wide on the bass side down to nil on the high e side. The only one I've seen put a trapeze tailpiece on one of these was islandmoose and if you can find his build diary, worth looking at, he didn't detail how he made the spacer. Once the spacer is made you can Rolling Stones it -paint it black- or stain to suit.

    The need for that improvised spacer is why I went for the 'easier' option of drilling for a stop bar tailpiece. Can't really expect a custom made tailpiece for what we pay for these kits, isn't doing your own thing part of the fun?

    Also, the only build I've used a trapeze type tailpiece on, the string spacing was slightly narrower than the bridge, not an issue if the tailpiece is centred and don't worry too much about the gap under the string bar part, once you have done the final set up - neck relief, action, intonation - it should be a couple of mm or so above the body and will only require putting a cloth between the tailpiece and body before you change strings.

    That is very long winded coming from me, just hope I haven't confused the issue. Nice colour btw.

    Grant

  8. #8
    GAStronomist Simon Barden's Avatar
    Join Date
    Oct 2016
    Location
    Reading, UK
    Posts
    10,547
    Good that the trapeze already has a hole in it for strap button. The one in the PBG kit picture doesn't seem to.

    It's all made harder because the rear of the guitar is at an angle where the trapeze has to go. I don't know how much adjustment there is with the two nuts holding the bar on, but it might be possible to loosed the high-E side nut and straighten out the angle of the bar, which may help with the arrangement and provide maximum string separation. You may then need to add a touch of thread lock or a small drop of superglue to keep the nut in place.

    If you've got a thin piece of foam, you might consider sticking some under the rear part of the trapeze to keep it from marking the finish on the top; location marked-up below.

    Click image for larger version. 

Name:	Mark-up.jpg 
Views:	134 
Size:	606.1 KB 
ID:	27014

  9. #9
    Overlord of Music fender3x's Avatar
    Join Date
    Jan 2016
    Location
    Miami, FL, USA
    Posts
    2,201
    Having done this once with a similar tailpiece, I have a couple of suggestions. Take the nuts off. You should be able to remove the bottom part of the tailpiece from the string retention bar. Use a torpedo level to make sure that that Bridge is not higher on one side than the other. If possible secure the guitar this way so it can't move from side to side.

    Click image for larger version. 

Name:	tailpiece.jpg 
Views:	141 
Size:	115.7 KB 
ID:	27057

    Now adjust the strings so that the two red lines are the same length. The middle of the bar is now the *natural* center.

    You now reattach the bottom part and adjust the nuts so that the hole at the bottom is the exact same distance from both nuts. The hole will be in the exact right place to attach.

    Hope this is clear. Writing quickly... ;-)

    P.S.: You can get a much fancier trapeze or stop tailpiece, but functionally this not a bad one. Mine is the bass version, but I have been pleasantly surprised at how good the sustain is, and how solidly it holds on. I only used it because I couldn't fit a proper stop tailpiece. But I am actually pretty happy with how it works and sounds, FWIW.
    Last edited by fender3x; 21-06-2018 at 11:06 AM.

  10. #10
    Overlord of Music fender3x's Avatar
    Join Date
    Jan 2016
    Location
    Miami, FL, USA
    Posts
    2,201
    OOPS! I just saw my error. Looking at the bridge a little closer, I see that the bass side is a little further "south" than the treble side. So the torpedo level on the bridge idea won't work because the string should be a little longer on the treble side than the bass side to the tailpiece. You can still find the center with string length, but I think you'll need to put the torpedo level on the nut, and measure the string length from there. A bit more cumbersome, but it will still work.

Posting Permissions

  • You may not post new threads
  • You may not post replies
  • You may not post attachments
  • You may not edit your posts
  •